Showing posts with label essie. Show all posts

Thursday, August 14, 2014

Struck By Lightning Nails

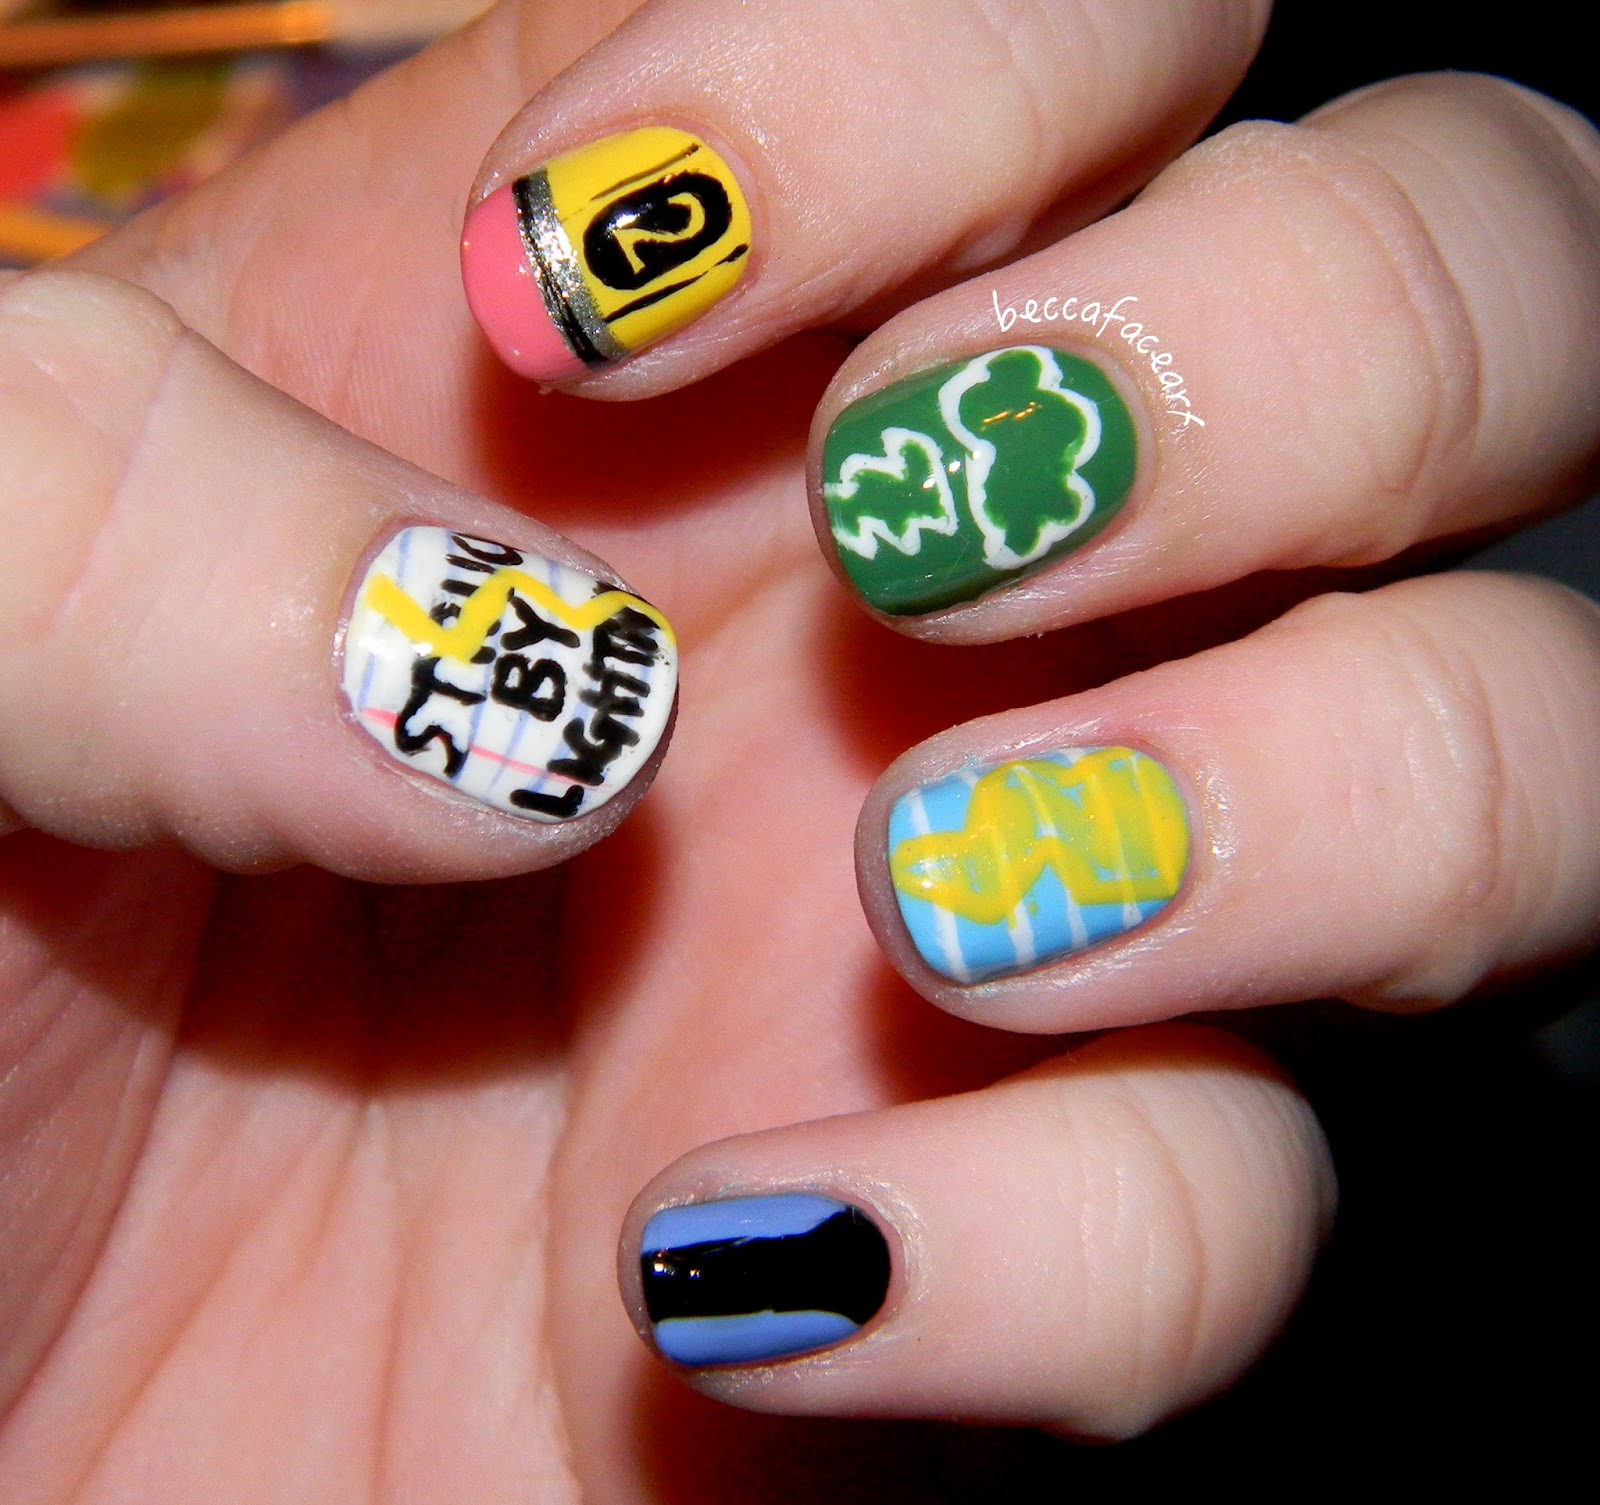
Hi there! I have a really cool design for you today! It's one of my favorites that I've ever done! :) It's based on the movie/book Struck by Lightning by Chris Colfer. If you haven't seen the movie, it's incredible. Do yourself a favor and watch it. It's a lovely film, and the book is just as amazing. Chris Colfer is probably one of the most talented men of our time, and I'm always eager to support him. So I painted my nails, inspired by his wonderful book!


Woo! I love these so much. I think I did a pretty good job of getting the images from the book and the movie right. :) Dare I even say they're pretty cute as a back to school design? Ha!

Thumb: Sinful Colors Snow Me White (base color), Sinful Colors Soul Mate (pink stripe on the side), China Glaze Secret Peri-Wink-le (blue horizontal stripes), Sally Hansen Mello Yellow (lightning), and black acrylic paint for the words.
Index: Sally Hansen Mello Yellow (base), Sally Hansen Celeb City (silver stripe), Sinful Colors Soul Mate (eraser tip), and black acrylic paint.
Middle: China Glaze Starboard (base), and white acrylic paint.
Ring: China Glaze Bahamian Escape (base), Sally Hansen Mello Yellow (lightning), and white acrylic paint.
Pinky: China Glaze Secret Peri-Wink-le (base) and black acrylic paint.
Topcoats: Seche Vite (glossy) and Essie Matte About You (matte)

I hope you like them as much as I do! I also hope you check out Struck By Lightning and the book that goes with it, because Chris Colfer deserves it and his work truly is incredible. Thanks so much for reading, have a great day, and happy painting! :)


Thursday, January 30, 2014

KBShimmer "Clown Puke" Swatch

Alrighty, another indie! KBShimmer Clown Puke. Woohoo! I LOVE THIS ONE. So much. It was on my list of polishes that I need for a very long time. It's perfect in every way - So I'm super excited to show you my swatch! You know the drill by now, I'll show you the swatch first and then talk more about the polish afterward. :)


This is one perfect coat of Clown Puke over two coats of Essie Mint Candy Apple (I also tried it over my universal glitter base color, OPI Gargantuan Green Grape, and I didn't like it as much! So MCA it is.) This indie is loaded with glitter of every size in every shape - hex, square, circle, stars, hearts, you name it! And they're in every color!! My favorite glitters were the giant circle glitters, which you can just barely see one on my thumb in the first picture. It's so good. And like I said, this is one coat. It's so full of glitter. I had to do minimal placing of glitters as well, they just kind of fell where I wanted them to go. And the formula is fantastic, of course. Despite the sheer magnitude of glitter in this polish, it isn't thick at all. So basically, I give it a 10/10, would wear over and over again because it's perfect and beautiful.

I received this polish for Christmas, so my opinion is honest and hopefully it convinced you that you need this polish. Everyone needs it, for real. And if you feel that you need it as badly as I did, you can purchase it on KBShimmer's Etsy shop and their website.

So I hope you enjoyed! Thanks so much for reading, have a great day, and happy painting! :)


Wednesday, January 29, 2014

31 Day Nail Art Challenge! Day 23: Inspired by a Movie

Heeeey! So for this challenge, I’m actually using the nails I wore when I went to see Thor: The Dark World. That’s inspired by a movie, right? J So this design, in my opinion, is not the most original Thor nails. And it’s not necessarily designed for Thor: The Dark World either. They’re just Thor and Loki nails, because I enjoy them both more than you would believe. So let’s get into it!


On my left hand I painted Loki because he’s my favorite. Don’t get me wrong, I like Thor a lot, but Loki’s such a good character and I am absolutely fascinated by his amorality. So on my thumb (not pictured here, but you can see it later on in the post) and ring finger, I painted two coats of Essie Good as Gold. On my index, middle, and pinky fingers, I painted three thin coats of Sinful Colors San Francisco. It’s such a lovely color, but so, so sheer. Then on my thumb, I painted “Loki” with San Francisco. On my ring finger, I painted a coat of a fine gold glitter (a random striper polish), but I think this design would look much better with some chunky gold glitter. I don’t have any. L And just because I wanted to keep the design simple, I painted Loki’s helmet on my middle finger with Good as Gold and some black paint with a tiny baby paintbrush. It’s adorable. And then I moved on to Thor!


On my right hand, I wanted to match my Thor nails to the style I painted Loki with, so on my thumb (again, not pictured, but you'll see it I promise), I painted two coats of Wet n' Wild Burgundy Frost. Then on my index, middle, and pinky fingers, I painted two coats of Wet n' Wild Denim Chrome. And on my ring finger, I painted two coats of Sally Hansen Celeb City and one coat of Essie Set in Stones. And for the designs - on my thumb I painted "Thor" with Celeb City and on my middle finger, I painted Mjölnir (or you could say Mew-Mew like Darcy in the movie) with Celeb City, Burgundy Frost and some black paint. 

And here's what they look like together!

There's those pesky thumbs!


So I hope you like them! I actually wore these to the movie premier, but I never posted them. But they fit the challenge perfectly, so hope was not lost and I finally got to show them to you. So let me know what you think, I'd love to hear from you!

Thanks for reading, have a great day, and happy painting! :)

Wednesday, January 8, 2014

31 Day Nail Art Challenge! Day 21: Inspired by a Color

Hellllooooooo~~ How's it going? :) So, if you're familiar with this challenge, you know that this prompt is notoroious for being ambiguous. What does it mean to be inspired by a color?? It could be any color, so what's challenging about it? Well, it was challenging. Because you know me... I automatically went to the turquoise polishes. But then I thought... No. This is a challenge, I can't go to my go-to polishes. So I went with a different color, one I don't wear very often. Inspired by the color of the glitter polish I used:


Periwinkle! It's so pretty. I painted two coats of China Glaze Secret Peri-wink-le on all of my nails and then painted one coat of Essie Stroke of Brilliance on my thumb and ring finger for a glittery accent. Simple! So I hope you like it. :D

Thanks for reading, have a great day, and happy painting! :)

Tuesday, December 31, 2013

I'm a liar! And two New Year's Eve designs for you...

Hello all! Yes, I am a liar. I said I would have a lot of holiday designs and I was going to be posting regularly again and whatnot, and it just didn't happen. Technically I did have several holiday designs, but I just never posted them. I'm still trying to decide if I want to post them or just wait until next year. It's been a hectic month. You know? Sometimes things just suck and it was one of those times for me, so I hope you're not too upset. I'm sorry that I'm failing, haha. But I hope that these two mani's make up for it! These would be great for a New Year's Eve party! :)


This is a super simple manicure - just black and silver textured polish! It's super chic and would be perfect for celebrating the new year. Here I've used two coats of OPI It's Frosty Outside on my thumb and ring finger, and three coats of OPI Emotions on my index, middle, and pinky fingers. 


And here's a slightly more complex design for those of you who like a little more out of your mani's - I'm wearing this design right now for my party/get-together tonight. (I apologize for the picture, I ended up taking the picture on my iPhone because I got fed up with the bad quality my camera was giving me.) On my thumb, middle, and pinky fingers I did two coats of Wet n' Wild Black Creme with a gold round stud on each. Then on my index, I painted two coats of OPI Louvre Me Louvre Me Not, which is one of my all time favorite OPIs. Such a great polish. And on my ring finger, I did two coats of Essie Good As Gold, with a coat of "So This Is Love" over it. "So This Is Love" is one of the custom polishes I made for my friends as their Christmas presents this year, so don't worry, there will be a full post about that polish coming up soon! Since you won't have that polish, a good substitute would be Orly Ridiculously Regal. And of course, you can always use gold polish and a dotter tool instead of studs.

Alrighty then! I hope you enjoyed the designs! And if I don't post again between now and 2014, I just want to say thank you so much for reading and sticking with me while I struggle through blogging, haha. I'm going to try a ton of new things in the new year, new things that I hope will allow me to post regularly and keep blogging fun instead of making it seem like a chore to me. I never wanted it to get that way, so hopefully the new things I'm going to try will spice it up and keep the nail art good for all of you as well. And I hope you all have an amazing New Year's Eve, and have an amazing time bringing in the new year. Thanks for reading, have a fantastic day, and happy painting! :)

Tuesday, October 29, 2013

Halloween Zombie Flesh Nails

WARNING! THIS POST IS NOT FOR THE FAINT-HEARTED. IF YOU ARE SQUEAMISH, YOU PROBABLY DON'T WANT ANY PART OF THIS. For this reason, I'm putting the pictures under a break! So read on if you can handle it. :)

Anyway, hello everyone! I know I'm cutting it pretty close to Halloween for these nails, but I am technically getting them up before Halloween! I wanted to wait until the last week before Halloween to do the really gory stuff. And I wish I could take the credit for this design, but it is not mine! I based it on a tutorial by PackaPunchPolish (WARNING: THIS VIDEO IS ALSO GORY IN A WAY SO DON'T WATCH IT IF YOU'RE EASILY SQUEAMISH I'M SERIOUS) on youtube. I have literally been waiting a year to do this, haha. I didn't do it exactly, I adapted it to zombie flesh instead, so it's extra gross. And since there's a tutorial for it already, I'm not really going to explain what I did, just what polishes I used. And now for the unveiling! Click the read more to see the pictures! This is your last chance to turn back!

Thursday, October 10, 2013

Pretty Pretty Princess Nails

Heeeey gurl, heeeey. So, I just got some new OPI polishes that I desperately wanted to wear. But it's October, and I also desperately wanted to wear some Halloween designs. The problem? All of the polishes I got were bright pink (and one super light purple). I didn't think this through. So, I came up with a solution - ¿¿Porqué no las dos?? Why not both? So I made up a little costume for my nails - a princess costume!!


Yes, I realize it's not very Halloween-appropriate. But who knows, someone out there might need it for an actual princess costume! On my thumb and ring finger, I did two coats of OPI Suzi's Hungary Again and then stamped the crown image from MASH plate 49 with Essie Good As Gold. The pink glitter pieces are from OPI Minnie Style. On my index, middle, and pinky fingers, I painted three coats of OPI Chic From Ears To Tail, and then stamped the little swirly image from Pueen plate 26 on the tips of my nails with Suzi's Hungary Again. And then I topcoated and watched the magic happen! These were really cute, and I would wear this design again in a heartbeat. My 20-something-year-olds group of friends and I thought they were precious, so I'm sure there are some kids (adults too) out there somewhere that would love these to go with their costume. Anyone out there being a princess for Halloween? Let me know!

Thanks so much for reading, have a great day, and happy painting! :)

Wednesday, September 11, 2013

Pastel Nautical Nails

Heeeeey guuuuuurl, how you doin'?

Okay, sorry. I had a moment. Anyway, who loves nautical nails?? (Hint: IT'S ME, IT'S TOTALLY ME)


(I apologize for the three pictures that look exactly alike, I apparently didn't get any better pictures before I took this design off)

Okay, so these aren't exactly pastel. But I didn't know what else to call them, so I took inspiration from the lovely, dusty, pastel teal that is OPI Gargantuan Green Grape. So for my thumb and ring finger, my base color was OPI Cajun Shrimp, with white acrylic paint stripes on them. On my middle finger, I painted Essie Good As Gold and then put e.l.f. Golden Goddess over that. Then for my index and pinky fingers, my base color was OPI Gargantuan Green Grape with stamped anchors from Cheeky plate 36 with Essie Good As Gold on them. 

These were absolutely precious, and they were a really nice break from the 31 Day Nail Art Challenge. Like I said in my previous post, my best friend left for a study abroad trip in Japan, and I felt like I needed some retail therapy - So I picked up my three base colors up there. Of course, I had to use them immediately, haha. I love nautical nail designs more than any other design, so it was a natural pick when I was looking for something easy and comforting to paint on my nails. I painted my sister's nails and then mine, all while she was reading scary stories to me. It was a pretty good way to spend a few hours! I'll be getting back to the Challenge in my next post, but until then... Thanks for reading, have a great day, and happy painting! :)

Sunday, September 8, 2013

31 Day Nail Art Challenge! Day 12: Stripes

Hi there! How's it going? I feel like being a little lax today with this post... So, stripes. Stripes, stripes, stripes. I love stripes! I usually like to hand-paint them with a striper brush, but I was using a polish that dries matte for the stripes, so I had to do it with tape instead. And if you've seen my other posts about tape manicures, you probably know that I am not a fan of them. They are always extremely messy and take FOREVER. Seriously, they take sooo long. I just don't think the payoff is worth the effort, most of the time. But this is a challenge, and I couldn't hand paint them, so tape it was! Here's what I came up with:


My base color was Essie Turquoise and Caicos. The stripes are China Glaze Stone Cold, which I just realized I've used for a chevron tape-mani once before, haha. Woops! I completely forgot about that, but I can't help it... Stone Cold is just wonderful for tape-manis, because it's so opaque and awesome. It goes great with every color, too. I hope this is different enough from the other one, haha. Anyway, I didn't really have any specific patterns for the stripes, I just made them different on every nail. It was cute. I do think if I had the chance, I'd go back and use a lighter base color. Turquoise and Caicos is pretty light, but I think I would need something brighter, like Funky Fingers Mrs. Mint. But either way, it was nice. So I hope you like it! And let me know if you try it.

Thanks for reading, have a great day, and happy painting! :)

Saturday, September 7, 2013

31 Day Nail Art Challenge! Day 10: Gradient Nails

Hi there! And now I'm back to getting caught up on those posts. I'm almost caught up, and I plan on getting them all done and caught up to what I have on my nails right now (which is Day 13: Animal Print!), so wish me luck! :)

Anyway, here's what I have for my gradient nails:


I know, I know. They're boring and completely uninspired. See, I was feeling especially lazy the day I painted these and I just didn't want to deal with making a really complicated gradient (particularly after my previous manicure with the rainbow gradient) that I would have to clean up, so this is what came of my laziness. I guess these are a lot like Effie Trinket's nails from Hunger Games? I wasn't going for a Hunger Games design, but I do love the color combination. My base color is Essie Big Spender, which is just the most lovely strawberry fuschia. I was actually pretty disappointed that I had to make a gradient out of it, because it's so wonderful on its own. But gradient it was! I sponged on Ulta High Roller. It's really simple! I promise my other designs won't be as simple and over-used as this. Especially the next day, which is Polka Dots (spoiler: I also did a gradient for that one).

So I hope you like it! Let me know what you think. Thanks for reading, have a great day, and happy painting! :)

Thursday, August 1, 2013

31 Day Nail Art Challenge! Day 2: Orange Nails

Hey there! So I got a little behind on these posts, so I'm going to be posting the Day 2 and Day 3 on the same day. Woops! Anyway, here's my orange nails:


I started off with two coats of China Glaze Life Preserver, and then I sponged a couple of layers of China Glaze Orange You Hot? onto the tips. Then I put on a coat of Essie Shine of the Times, which is usually orange in most lighting, even though it can be green at the right angle. And of course, I always wear a matte top coat (Essie's Matte About You) over flakies polishes, because I think it defines the shape of the flakies and gives it a cool scale effect. My mom particularly liked these, because she thought they looked like a sunrise. So I hope you like them! Onto the next! 

Thanks for reading, have a great day, and happy painting! :)


Friday, July 26, 2013

Marina and the Diamonds Nails

Hey there! So a couple of days ago I got really bored and wanted to paint my nails, but I had no idea what to do, and I didn't feel like having anything too flashy or too plain, so it was a difficult choice. I was listening to Marina and the Diamonds' album Electra Heart and then I was struck with inspiration! Marina and the Diamonds nails. But not based on any of the nail art she wears (because she is known to wear some pretty unique designs in her music videos), it was just based on the colors I saw in some of her music videos and I just took creative license, basically. But it still looks Marina Diamandis inspired!


On my thumb, middle, and pinky fingers are two coats of Love & Beauty Baby Blue (one of the recurring colors in her videos as well as a color on the album cover). Then off to the right side, I painted a small black heart with acrylic paint like she wears as her character Electra Heart (the character she named the album after) on her face:


Then on my index finger, I painted a coat of Sally Hansen XTreme Wear Celeb City, one coat of Essie Set in Stone, and one coat of Pure Ice Dazzle Me. That's a lot of sparkle! But I needed the coverage of the Essie polish, and the holographic silver glitters of the Pure Ice polish. So it was necessary.

Then on my ring finger, I picked colors based on the lipstick she wore in her music video for Fear and Loathing:


I did two coats of China Glaze Life is Rosy and I sponged on the tip and up the center with China Glaze Thataway. 

And that's it! I don't know if it necessarily matches the blue and the silver, but it does add a touch of warmth to the look. So I hope you like it! And if you don't know who Marina and the Diamonds is, go look her up! She's absolutely fantastic. Thanks for reading, have a great day, and happy painting! :)


Wednesday, May 8, 2013

Turquoise and Silver Glitter Nails

Hey there! This is going to be an exciting post. So, sometimes I like to just have plain nails (as close to plain as I can get, anyway), and this is what I ended up with:

(natural light, indoors)

This is a pretty normal design for me, but it was nice. The combination of a creme color and a glitter polish as an accent nail can be used for any colors you want. I, of course, used a turquoise and silver glitter. The turquoise is China Glaze For Audrey (it's a really popular polish - but my bottle's formula is gross and goopy, so I don't use it often). And for the silver glitter, I used a base coat of Sally Hansen Xtreme Wear Celeb City and then one coat of Essie Set In Stones. I feel like this also would have looked very nice without the glitter, but I needed a little bit of glam. 

I reeeeaally liked this manicure, but then something happened. I was pulling my windows down, and one of my nails broke completely down to the skin. Needless to say, it hurt like rip. I had class early that morning, so I had no choice but to pack my nail clippers and a file in my bag and go hide out in the bathroom (really, I went and hid in a stall - it was so weird and I felt sceezy afterwards) to even them out. I didn't take a picture of the nail difference with just that broken nail (because I was in a bathroom stall and it was already weird enough), but I do have these:

(indoors, taken the night before)

(indoors, taken when I got home and repainted my nails)


(Other than the size of my nails, you can also see a huge difference in my cuticles - they're not as gross any more!)

So there you go, it also works on short nails! And I actually found I was waaaay happier with it on my shorter nails. I don't know why. But you can do it no matter what size your nails are. :) So I hope you enjoyed it, even though it's not that special. I liked it! 
Thanks for reading, have a nice day, and happy painting! :)


Thursday, February 21, 2013

Turquoise Star Nails

Hello there! I have another stamped design for you. :) My friend and I both got duplicate nail polish for Christmas, so we decided to swap. She gave me Essie Turquoise and Caicos in exchange for Sinful Colors Love Nails (and a few others, because a Sinful Colors polish is not an equal exchange for an Essie polish). I didn't know if I would like it, because I already had many different turquoise polishes, and this one seemed really ordinary. I was soooo wrong.


(taken indoors with my iPhone  - my camera was still out of commission at the time)

The base color is of course Essie Turquoise and Caicos. It's probably the most beautiful turquoise nail polish I've ever owned (my camera phone just doesn't do it justice). It's so simple, but the formula was fantastic, and if I do say so myself, I think it looked amazing with my skin tone. The formula seems really sheer at first, but I was able to get it opaque in two coats. The sheerness makes it look really delicate. I just really loved it. If you don't own it and you're an Essie fan, why don't you own it? You should go out and get it right now. 

I thought about wearing it alone, but why would I want to make it easy on myself? I added a coat of multicolored glitter, Sinful Colors Opal Glitter, and then I used the star design from MASH plate 49 with Sinful Colors Snow Me White (my favorite non-Konad brand of white polish for stamping). The matte white looked so cool over the glitter. In my last post, I made a comment about how long my manicure lasted (it was about 5 days - a really long time for me since my manicures only last about 2-3 days before I get bored with it/ it chips/ I peel it off during my classes). Well, this one lasted a full 7 days without chipping. I REALLY loved this design. So pretty. I hope you can try it out! A cheaper alternative for the Essie polish is Sinful Colors Mint Apple. It's not a dupe of the Essie polish, but it is still a very pretty turquoise and I almost used it instead of Turquoise and Caicos. I'm glad I didn't though, because this one is so lovely. Thanks for reading, have a good day, and happy painting! :)


Tuesday, February 19, 2013

Matte Flecked Purple Nails

Hello there! I was worried that I wouldn't keep updating this blog, and see, that's exactly what I've done. But I'm back! And I have taken photos every time I painted my nails over the past several weeks, so all I have to do now is upload them all.

So I'll start with this manicure! I went to Ulta several weeks ago and found a Layla Ceramic Effects polish called The Butterfly Effect. It was absolutely beautiful, but out of my price range at the time. Plus, I knew I would be able to sort-of recreate the effect at home using some of my other polishes! Here is my result:


(Indoors - the first two photos with regular lighting, the second photo with flash)

I used two coats of Sinful Colors Let's Talk as my purple base color, and then a coat of Essie Shine of the Times. The Layla polish does not have a matte finish, but I really wanted the fleck polish to shine through, so I slapped on a coat of Essie Matte About You

I really wish the photos had turned out better; the last photo was waaaay too saturated because of the flash on my camera. But then I feel like the first two photos are washed out. The color in person was a mixture of the first and second photos. Very vibrant, but also toned down. I loved it! My favorite part about this manicure was the texture, honestly. I love the feel of the matte top coat. It's so smooth! 

Well, I hope you liked this one! Definitely give it a go if you have the polishes (or similar ones!). It was really awesome and got tons of compliments! Thanks for reading, have a nice day, and happy painting! :)