Showing posts with label mash stamping. Show all posts

Sunday, August 10, 2014

Back again... and Mermaid nails! :)

Hello everyone! It's been a looooooooooong time. An indecent amount of time. And for that, I am so sorry. Really, I tried to keep up with it, but I've had some mental health problems over the summer (after the crazy semester from hell at school), and I just kind of... stopped caring about my nails. I did still keep them mostly painted, but I've neglected my cuticles and I didn't do any nail art whatsoever. This is something that I never wanted to happen, ever. I love painting my nails and blogging with you guys, and I was always afraid that I would just stop one day and not start back up again. Well, after a long summer and some time to get back up on the metaphorical horse, I'm back! Another semester in college is going to be starting for me next week, and I decided it was time to nip this little mood in the bud and get back into the groove of things. :) So. I have a few more things to say and then I'll show you some mermaid nails! :)

1) If you have been keeping track of my 31 Day Nail Art Challenge posts, I am sorry to say that I'm not going to be continuing that. It honestly was a mistake of me to try and take that on, because I just wasn't that dedicated to it from the get-go. That being said, I have a few designs in a folder on my computer that I did complete for the challenge, but never posted. So I'll post those, but they won't be part of the challenge, because maaaaan. Forget that challenge *z-snap*.
2) And this brings me to my next point. I have several designs that I never posted from back in March-May. I will probably post some of those, because I like them and they're still nice designs... they're just a few months old, haha. So you will probably see those for the next few posts before any actually recent designs.
3) And finally, as you all know, I obviously have a problem with how long my posts are. I talk too much. As such, I'm going to try and keep them AS CONDENSED AS POSSIBLE in the future. For real. For designs, I might just say what polishes/stamps/paints I use and maybe elaborate a teeny tiny bit (an example will be below for the mermaid design). For reviews of polishes (such as indie polishes and swatches and things like that), those will be longer. But I honestly have to get a grip on the length of my posts, it's ridiculous.

With that, I just want to thank all of you for being patient with me, and for being amazing in general. :) You're wonderful and I am excited to come back to blogging because you all make it fun! And now, on to the nail art~~~~~~~~~ WOOOSH


Meeeermaaaaiiidssssss! I love mermaids, I think they're great. And they're the perfect summer manicure!

Base color: China Glaze Keep Calm, Paint On
Stamp colors: (gradient - from cuticle to nail tip) China Glaze Fancy Pants, Spontaneous, and Tart-y for the Party
Stamp: Mash Stamp Plate 39
Glitter: Orly Mermaid Tale

I really like for the scales to stand out, so I picked Keep Calm, Paint On as my base color because it's very pale and accepts other colors well. And the scales are all colors that look great together. The whole look is very shimmery and the glitter (only painted around the edges) gives a lovely rainbow pop on your nails. It's a subtle design but it's very eye catching! :) I hope you like it as much as I do!

Let me know if you have any questions or concerns, and let me know what you think of the new way of doing these posts. As in, do you prefer me to type everything out and keep my posts longer, or would you prefer me to list my supplies and keep it simple? I'd love to here from you about this. I just want to thank you again so much for reading, it absolutely means the world to me! Have a great day, and happy painting! :)


Sunday, October 13, 2013

Halloween Witch's Brew/Magic Slime Nails

Wooo, I'm on a roll today! It's just because I've already painted all these designs, I just didn't upload them the day I did them. Sigh, my blog is just a perpetual mess. Anyway, here is my Witch's Brew/Magic Slime (I couldn't decide which name fit it better) design:


I don't think I meant to, but I managed to get all the most obnoxious Halloween colors in it? But I love it!! My base color is Sinful Colors Cloud 9. Then I took China Glaze Grape Juice and dotted it along the tips in a dripping pattern. It wasn't sparkly enough for me, so then I covered it with a purple glitter from Love & Beauty (Forever 21's brand) - I have no idea what the name of it is, because my bottle has no label. But I tried googling it, and I've seen it called Cauldron? Or it could just be Purple Glitter. I'm not sure. If you know what it's called, please let me know. Anyway, over that, I put Icing Love It and Orly Mermaid Tale for some magic bits (glitter, basically). And then, to make it even more spooky, I stamped the spider image from MASH plate 38 with Sinful Colors Innocent on my accent nails. Whew, that's a lot. But lemme tell you... They were so Halloween. They screamed Halloween. So I hope you like them! Let me know what you think. :)

Thanks for reading, have a wonderful day, and happy painting! :)

Thursday, October 10, 2013

Pretty Pretty Princess Nails

Heeeey gurl, heeeey. So, I just got some new OPI polishes that I desperately wanted to wear. But it's October, and I also desperately wanted to wear some Halloween designs. The problem? All of the polishes I got were bright pink (and one super light purple). I didn't think this through. So, I came up with a solution - ¿¿Porqué no las dos?? Why not both? So I made up a little costume for my nails - a princess costume!!


Yes, I realize it's not very Halloween-appropriate. But who knows, someone out there might need it for an actual princess costume! On my thumb and ring finger, I did two coats of OPI Suzi's Hungary Again and then stamped the crown image from MASH plate 49 with Essie Good As Gold. The pink glitter pieces are from OPI Minnie Style. On my index, middle, and pinky fingers, I painted three coats of OPI Chic From Ears To Tail, and then stamped the little swirly image from Pueen plate 26 on the tips of my nails with Suzi's Hungary Again. And then I topcoated and watched the magic happen! These were really cute, and I would wear this design again in a heartbeat. My 20-something-year-olds group of friends and I thought they were precious, so I'm sure there are some kids (adults too) out there somewhere that would love these to go with their costume. Anyone out there being a princess for Halloween? Let me know!

Thanks so much for reading, have a great day, and happy painting! :)

Tuesday, September 10, 2013

Gold Leaf-esque Nails

Alright, who's ready for a break from the 31 day nail art challenge?? I certainly am! My sister and I read scary stories to each other two weekends ago while I painted her nails and mine. My best friend left for Japan that weekend on a study abroad trip, and I really really didn't want to paint animal print on my nails, I just wanted something comforting and lovely. But my nails will be in the next post. This post is about what I painted on my sister's nails!


(This one was just for fun - look at how much shorter my nails are than hers! And this is right before I cut my nails because they were getting a little too long for my tastes! AND my sister is six years younger than me! What I'm getting at here is that it's weird.)

*Ahem* Anyway... She couldn't decide what she wanted (which is pretty unusual, because she almost always has something extremely complex and time-consuming in mine), so she picked a color that she liked and I kind of went with it. The base color is China Glaze Custom Kicks, which is just the perfect polish. Literally, it has no flaws. It's opaque in one coat, and it's got just enough gold shimmer in it to make it buttery. I love it. And Em did too! Then I stamped over it with Essie Good As Gold and the weird splotchy stamp from Pueen plate 45 (you could also achieve this effect with gold leaf, or with a gold topcoat. 

We almost left it like that, because Em loved the combination so much. But I said, "Nay! We shall add moooore!!" And so I stamped the little flower from Mash plate 29 with a gradient of Wet n' Wild Black Creme and OPI Cajun Shrimp on the accent nails. They were AWESOME. They received lots of compliments and Em loved them. We were really sad to see them go, because Em is in marching band and they're not allowed to have polish on. So before football season, she would only let me paint her nails once every 2 to 3 weeks (because seriously she could make her polish last that long without chipping and I just don't understand because I can barely get it to last for 2 days), but now that she has to remove all polish on Thursday night, I get to paint her nails every week! Yippeeeeeee! So expect to see a lot more of her nails on here in the next several months! 

Well, this post has been long enough, I think I'll leave you be. Thanks for reading, have a great day, and happy painting! :)

Thursday, August 29, 2013

31 Day Nail Art Challenge! Day 6: Violet Nails

Heeeeeeeeeeeey there! Who's ready for some purple nails?? I know I am! Featuring my friend Jasmine's nails:


These were super awesome, but also a huge pain in the butt. We kept having to re-do the stripes and the skull and it took forever. But I think the payoff was worth it. On her index, middle, and pinky fingers we started off with two coats of China Glaze Fancy Pants. Then we stamped the vertical lines over it with China Glaze Tart-y for the Party and Mash plate 46. On her ring finger and thumb, we painted one coat of Sally Hansen Xtreme Wear Black Out and then one coat of Wet n' Wild Fergie Rock n' Roll, which is just the prettiest glitter over black polish. Then we stamped the skull from Mash plate 29 with Sinful Colors Snow Me White. Here's what it looks like on my nails:


Jasmine and I especially liked how you could see the pink shimmer in Fancy Pants under the creamy finish of Tart-y for the Party. It was really awesome! So, I hope you like it as much as we did, and let me know what you think! Thanks for reading, have a great day, and happy painting! :)


Thursday, August 1, 2013

31 Day Nail Art Challenge! Day 3: Yellow Nails

Hi there! So, I have to admit... I thought about cheating on this one. I love the color yellow, but it looks awful on me because of my skin tone and I figured to avoid wearing it, I could just paint a few nails for pictures and then take it off and move on to green. BUT. This would not be called a challenge if it wasn't difficult, right? So I'm challenging myself! Yellow nails all the way!! And if I have to say so myself, they turned out GREAT! I love them, they're super sunny and cute, and I haven't taken them off yet because they don't look bad at all. So here is what I came up with:


Isn't it pretty? Yes, yes it is. Anyway, I started off with three coats of Sally Hansen Xtreme Wear Mellow Yellow and then one coat of China Glaze White Cap. I stamped the little flower on Mash plate 35 with Sinful Colors Snow Me White several times on each nail in random spots, but always making sure that one flower was completely visible. These turned out so cute! I'm still not sure yellow is my color, but these are very bright and I'm enjoying them. So no cheating for me! 

Anyway, thanks for reading, have a great day, and happy painting! :)


Saturday, July 6, 2013

Delicate Flower Nails

Hey there! Do you ever just have one of those days when you don't want to wear any bright or flashy polish? Sometimes it's just nice to wear something toned down. Well, I had one of those weeks, and I ended up doing these really delicate flowery nails inspired by Packapunchpolish's tutorial (watch it, it's awesome and Sam is fantastic).


(Pardon my pinky - I botched the stamping on that one!)

I wanted to completely replicate Packapunchpolish's design (because I loved it so much and it was exactly what I wanted the week I wore this), but I don't have the Bundle Monster stamp set that she used. So I had to use the next best thing - the flower from Mash plate 40. I followed Sam's tutorial exactly, except I substituted the flower stamp for the BM one she used. I also used OPI Don't Touch My Tutu and Pirouette My Whistle, and I stamped with Sinful Colors Snow Me White.

I particularly loved how the flower stamp almost wrapped around the tips of my nails, making it look like I had French tips on there too. They were so lovely and delicate! Anyway, if you haven't checked out Packapunchpolish's tutorial, definitely do so. She explains it much better than I do! I hope you like this one. Thanks for reading, have a good day, and happy painting! :)

Thursday, May 23, 2013

Turquoise and Gold Flower Nails

Hi there! See a trend yet? I really like turquoise. I honestly didn't realize how much I wear it until I go back and see just how many posts I have on here with turquoise nail polish. Oops! In the future I'll try to make it a little different! Anyway, this is a basic stamped design, but it is sooooooo pretty. I LOVED this design. I'd do it again any day.

(indoors, natural lighting)


Isn't it pretty?? Gah, I just loved it. For my base color, I used China Glaze Custom Kicks. It was perfect for this design because it has a very subtle gold shimmer in it. I painted two coats of Custom Kicks on all of my nails except for my ring finger, on which I painted two coats of Ulta High Roller. I also used High Roller to stamp the swirly flower design, which is from MASH image plate Mash-40. I absolutely loved how this turned out (except for the bubbles you can plainly see on my ring finger caused by my top coat), but I do think it would have looked much better if I had some chunky gold glitter to put over my ring finger. I apparently don't own any. Welp! I liked it anyway. And I hope you enjoy this too! You don't have to have this specific stamp to replicate this design. I think it would look equally as nice with just a swirly delicate design. It's up to you! Either way, this color combination is unbeatable. So thanks for reading, have a good day, and happy painting! :)

Thursday, February 21, 2013

Valentines Day Nails #1

Hello! Yes, I'm aware it is well after Valentines Day. But I did paint my nails to celebrate (Singles Awareness Day, that is), so I'll share it with you anyway:

(indoors, natural lighting - with my newly fixed camera)

(indoors under a lamp with my iPhone - before my camera was fixed)

This was such a cute design. I wish the stamp had come out better, but oh well. They looked really nice and sleek if you didn't look too closely at them, haha. For this design, I used MASH plate 38. My base color was Sally Hansen Insta-Dri Petal Pusher, my go-to nude color. The color I used for the stamp was  China Glaze Ahoy!, one of my favorite pinks, if not my absolute favorite. I don't really like pink all that much, but Ahoy! is so beautiful. It has a gold shimmer in it that's very subtle, but perfect in every way. I used it again for another Valentines Day design, so I'll be posting pictures of it again later! 

So thanks for reading, have a good day, and happy painting! :)


Turquoise Star Nails

Hello there! I have another stamped design for you. :) My friend and I both got duplicate nail polish for Christmas, so we decided to swap. She gave me Essie Turquoise and Caicos in exchange for Sinful Colors Love Nails (and a few others, because a Sinful Colors polish is not an equal exchange for an Essie polish). I didn't know if I would like it, because I already had many different turquoise polishes, and this one seemed really ordinary. I was soooo wrong.


(taken indoors with my iPhone  - my camera was still out of commission at the time)

The base color is of course Essie Turquoise and Caicos. It's probably the most beautiful turquoise nail polish I've ever owned (my camera phone just doesn't do it justice). It's so simple, but the formula was fantastic, and if I do say so myself, I think it looked amazing with my skin tone. The formula seems really sheer at first, but I was able to get it opaque in two coats. The sheerness makes it look really delicate. I just really loved it. If you don't own it and you're an Essie fan, why don't you own it? You should go out and get it right now. 

I thought about wearing it alone, but why would I want to make it easy on myself? I added a coat of multicolored glitter, Sinful Colors Opal Glitter, and then I used the star design from MASH plate 49 with Sinful Colors Snow Me White (my favorite non-Konad brand of white polish for stamping). The matte white looked so cool over the glitter. In my last post, I made a comment about how long my manicure lasted (it was about 5 days - a really long time for me since my manicures only last about 2-3 days before I get bored with it/ it chips/ I peel it off during my classes). Well, this one lasted a full 7 days without chipping. I REALLY loved this design. So pretty. I hope you can try it out! A cheaper alternative for the Essie polish is Sinful Colors Mint Apple. It's not a dupe of the Essie polish, but it is still a very pretty turquoise and I almost used it instead of Turquoise and Caicos. I'm glad I didn't though, because this one is so lovely. Thanks for reading, have a good day, and happy painting! :)


Monday, January 21, 2013

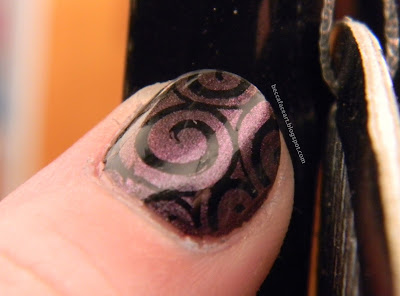
Iridescent Swirl Nails

Sorry about that title... I'm not really sure what to call these! I went to Ulta yesterday and got the only Essence polish I've ever been interested in: Chic Reloaded. It's a beautiful dark polish that is a greenish-grey at one angle and a plum-like, shimmery purple at another. Kind of reminds me of a scarab beetle. And since my tiger nails chipped so quickly, I was glad to try it out tonight! I started out wearing just the Essence polish by itself, but I figured I could go for some extra oomph. But I didn't want to detract from Chic Reloaded with a crazy design over it, so I decided to go with something simple!


(Sorry for the odd angles, I was trying to get the purple shimmer to show up - these were taken indoors with flash)

I used MASH plate 40 for the swirls and the polish I used for the stamping may surprise you. I have a couple of those Revlon Moon Candy sticks with the double sided polish - looks like this:


I absolutely hate them - the effect would have been nice had the glitter/flaky/whatever polish been executed well. It's clumpy and feels gross on my nails, and yeah. I just don't like them. BUT the one thing they did really well is the creme polish side. I LOVE THEM. They're literally some of the most opaque polishes I've ever used. So for stamping (if I need black polish), I always use the black polish on the end of Revlon's Moon Candy Moon Dust. (I also like the navy blue polish on the end of Galactic.)

I took two sets of pictures because I could not for the life of me get the purple shimmer in this polish to show up (Edit: Funny enough, I took the picture above of the Revlon after I had typed this sentence up and added it in later - the purple showed up the first time. Figures). I tried different angles, different lighting, and different settings on my camera. Nothing was working. But I finally did get some okay pictures of the purple:


The effect is much more dramatic in person. It almost has a Burtonesque feel to it! Kind of. I like it. I wish it came out on camera better though! Like I said in my last post, I hope to beat the day light sometime so I can take pictures outside, because I know those will turn out much better. It seems like I only paint my nails at night nowadays. 
Anyway, until next time, thanks for reading, have a nice day, and happy painting! :)


Neon Tiger Nails

Hello again! I wanted to share my weekend manicure with you (and I say weekend because I painted my nails on Friday and they chipped yesterday - 2 freaking days??), so here they are:

(indoors w/ flash)

If you're wondering if I painted those stripes myself, I definitely didn't. Like I said in my introduction post, I recently got a set of MASH stamping plates, and I've been working my way through those images. So this is just a heads up - probably going to see stamped images for a while. They're just so much more convenient.

For this design, I started off with a base coat (Seche Clear), and then I added two coats of China Glaze Frostbite. Gotta admit, I almost didn't get that polish because I just couldn't see myself wearing it too often, but my sister convinced me, and it is fantastic. Bright, electric blue. I love it. After that, I used MASH plate 41 and stamped the tiger stripe image on all of my nails with Sinful Colors Innocent, which is a really bright greenish yellow (more green than yellow, but you can't really tell from the photo) creme. Not the most perfect polish for stamping, but I loved the combination (both the colors and the different finishes). I topped it off with Seche Vite top coat.

Sorry about my awful clean up job around my cuticles, and also sorry for the picture. My camera isn't that great and it seems like the only usable images I can get are from using the flash, which tends to wash out the colors. Maybe one of these days I'll beat the day light and be able to take some photos outside! Until then, thanks for reading, have a great day, and happy painting! :)