Showing posts with label sally hansen xtreme wear. Show all posts

Tuesday, October 22, 2013

Halloween Purple People Eater Nails

Heeeyyyyyoooooo! So, I have been crazy busy. It's ridiculous how much homework I have. But I finally got a night off! So I figured I needed to update a few posts while I can! And thus, I present to you a design inspired by my favorite Halloween song - Purple People Eater!


Isn't he cute?? In the song, he's a "one-eyed, one-horned, flying purple-people-eater." And it actually does say in the song that he eats purple people, not that he's purple. So I chose a different color instead - I started with a base color of China Glaze Life Preserver, and then I did a coat of China Glaze Glitter Goblin, which is a mix of orange, silver, and holographic glitters. It looks out of this world, so I thought it fit! Anyway, then I stamped a teeny tiny wing from the heart image on Pueen plate 41. Then I dabbed a little topcoat on it and placed a single googly eye. I love those googly eyes. Anyway, then I painted on the horn and the mouth with acrylic paint. 

Then on my other hand.... PURPLE PEOPLE! So, I bet you're wondering what's up with my color choices, because they don't really match. Well, I was supposed to go to a mini-golf course that's indoors and has black lights all over the place, so I painted these with the glowiest polish I own - Funky Fingers Like Clockwork!


Woo! These babies glowed even in the daylight, that polish is so freaking bright. Anyway, I put to coats of Like Clockwork over one coat of Sally Hansen White On, and then I painted on the purple people. The monster eats purple people, so I made them look like little gingerbread men, with some of them having bites taken out of them already! They were super cute.

So I hope you like it! Hopefully I did the song justice, because it is seriously the best Halloween song other than the Monster Mash (maybe I'll do that next.... hmm.) Anyway, thanks for reading, have a great day, and happy painting! :)


Saturday, September 7, 2013

31 Day Nail Art Challenge! Day 11: Polka Dots

Heeeeey! So... polka dots! That's what this design was all about. I had actually been planning this design for months, I just never got around to doing it and then I forgot about it. But when I saw that one of the days was polka dots, I remembered! So here they are:


Let me just say, and I know I say this a lot, but I LOVED these. They were both bright and dark and just overall they were really cute. And the good thing about them is that they look great on both long and short nails! My sister said the colors reminded her of sunsets. Since both of my base colors are really sheer, I just started the gradient without a solid color base. So the two colors are China Glaze Thataway and Sinful Colors Let's Talk. Then, of course, came the polka dots. I used a large dotting tool (maybe a medium one? I'm not really sure - but it was big enough to make those sized polka dots) and Sally Hansen Black Out for the dots. I almost put white dots, but I think it would have made it more springy than I wanted. So black dots happened! I hope you like it. Let me know if you try it out!

Thanks for reading, have a great day, and happy painting! :)

Thursday, August 29, 2013

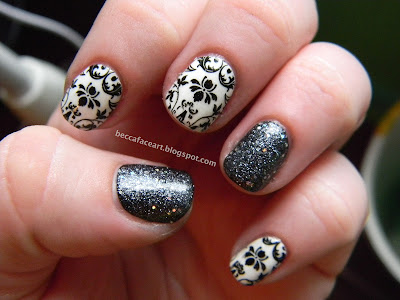
31 Day Nail Art Challenge! Day 7: Black and White Nails

Hi there! I think this is going to be my last post for today, because I really need to work on things for my classes, but I will try to get the rest of them uploaded soon, because I got pretty far behind. Anyway, here are my black and white nails:


It's super chic, isn't it? I felt really fancy wearing these. On my index, middle, and pinky fingers I painted one coat of Sally Hansen Xtreme Wear White On and then two coats of China Glaze Dandy-Lyin' Around. Then I stamped over it with Wet n' Wild Black Creme and Pueen plate 44. Then on my ring finger and thumb, I painted a coat of Sally Hansen Xtreme Wear Black Out, and then two coats of Wet n' Wild Rock n' Roll, which is one of the best glitter polishes. So I hope you like these! Thanks for reading, have a great day, and happy painting! :)

31 Day Nail Art Challenge! Day 6: Violet Nails

Heeeeeeeeeeeey there! Who's ready for some purple nails?? I know I am! Featuring my friend Jasmine's nails:


These were super awesome, but also a huge pain in the butt. We kept having to re-do the stripes and the skull and it took forever. But I think the payoff was worth it. On her index, middle, and pinky fingers we started off with two coats of China Glaze Fancy Pants. Then we stamped the vertical lines over it with China Glaze Tart-y for the Party and Mash plate 46. On her ring finger and thumb, we painted one coat of Sally Hansen Xtreme Wear Black Out and then one coat of Wet n' Wild Fergie Rock n' Roll, which is just the prettiest glitter over black polish. Then we stamped the skull from Mash plate 29 with Sinful Colors Snow Me White. Here's what it looks like on my nails:


Jasmine and I especially liked how you could see the pink shimmer in Fancy Pants under the creamy finish of Tart-y for the Party. It was really awesome! So, I hope you like it as much as we did, and let me know what you think! Thanks for reading, have a great day, and happy painting! :)


31 Day Nail Art Challenge! Day 5: Blue Nails

Hi there! Long time no see. I have been keeping up with the nail art challenge, I just haven't updated my blog posts because I have been so busy with my classes starting back up. So they've kind of been piling up all this time. But I'm trying to get on top of things! So I'll start where I left off - blue nails!

I had something completely different in mind, but then when I actually went to paint them, I wanted something more dramatic and with a little more contrast.


See, very visually interesting because the colors are so contrasting! On my index, middle, and pinky fingers, I painted two coats of OPI Swimsuit... Nailed It! I have been waiting forever for the perfect time to use this polish, because on one hand it is gorgeous, but on the other hand it stains like a mofo. But it is a flawless match to the color of my glitter, so I had to use it! Then on my ring finger and thumb, I painted two coats of Sally Hansen Xtreme Wear White On and then one coat of China Glaze Mosaic Madness. These were really awesome and dramatic, and I loved them. So I hope you like them too! On to the next post! Thanks so much for reading, have a great day, and happy painting! :)

Thursday, August 1, 2013

31 Day Nail Art Challenge! Day 3: Yellow Nails

Hi there! So, I have to admit... I thought about cheating on this one. I love the color yellow, but it looks awful on me because of my skin tone and I figured to avoid wearing it, I could just paint a few nails for pictures and then take it off and move on to green. BUT. This would not be called a challenge if it wasn't difficult, right? So I'm challenging myself! Yellow nails all the way!! And if I have to say so myself, they turned out GREAT! I love them, they're super sunny and cute, and I haven't taken them off yet because they don't look bad at all. So here is what I came up with:


Isn't it pretty? Yes, yes it is. Anyway, I started off with three coats of Sally Hansen Xtreme Wear Mellow Yellow and then one coat of China Glaze White Cap. I stamped the little flower on Mash plate 35 with Sinful Colors Snow Me White several times on each nail in random spots, but always making sure that one flower was completely visible. These turned out so cute! I'm still not sure yellow is my color, but these are very bright and I'm enjoying them. So no cheating for me! 

Anyway, thanks for reading, have a great day, and happy painting! :)


Friday, July 26, 2013

Marina and the Diamonds Nails

Hey there! So a couple of days ago I got really bored and wanted to paint my nails, but I had no idea what to do, and I didn't feel like having anything too flashy or too plain, so it was a difficult choice. I was listening to Marina and the Diamonds' album Electra Heart and then I was struck with inspiration! Marina and the Diamonds nails. But not based on any of the nail art she wears (because she is known to wear some pretty unique designs in her music videos), it was just based on the colors I saw in some of her music videos and I just took creative license, basically. But it still looks Marina Diamandis inspired!


On my thumb, middle, and pinky fingers are two coats of Love & Beauty Baby Blue (one of the recurring colors in her videos as well as a color on the album cover). Then off to the right side, I painted a small black heart with acrylic paint like she wears as her character Electra Heart (the character she named the album after) on her face:


Then on my index finger, I painted a coat of Sally Hansen XTreme Wear Celeb City, one coat of Essie Set in Stone, and one coat of Pure Ice Dazzle Me. That's a lot of sparkle! But I needed the coverage of the Essie polish, and the holographic silver glitters of the Pure Ice polish. So it was necessary.

Then on my ring finger, I picked colors based on the lipstick she wore in her music video for Fear and Loathing:


I did two coats of China Glaze Life is Rosy and I sponged on the tip and up the center with China Glaze Thataway. 

And that's it! I don't know if it necessarily matches the blue and the silver, but it does add a touch of warmth to the look. So I hope you like it! And if you don't know who Marina and the Diamonds is, go look her up! She's absolutely fantastic. Thanks for reading, have a great day, and happy painting! :)


Saturday, July 20, 2013

Neon Lightning and Drip Nails

Hello again! So for this post, I'm sharing my sister's nails again. She wanted something bright, but straight up neon isn't really her style. So we went with this:


I started with a base coat of Sally Hansen XTreme Wear Black Out on all the nails and then on the pinky, middle, and index fingers I created a paint drip effect with a dotter tool and Sally Hansen XTreme Wear White On. I then went over the drips with my neon yellow, China Glaze Sun-Kissed. And on her ring finger and thumb, I used scotch tape to make a lightning bolt and then I painted a quick layer of the white polish and gave it a few seconds to dry before I put on a coat of Sun-Kissed. Remove the tape and there it is! The pictures definitely don't do it justice, over that white polish it's incredibly, blindingly bright. Everyone stares at her nails because they're so freaking bright! And on top of that, she's been at band camp all week and they're out in the sun all day and I can't even imagine how she's getting anything done since these are so distracting. Anyway, I hope you like them! Thanks for reading, have a great day, and happy painting! :)

Tuesday, July 16, 2013

Pink Bow Nails

Hi there! The title may be misleading... I painted my nails pink and stamped a bow on them, they're not pink bows. They were so cute!! And also, this design set a record for me - they lasted a full seven days without chipping once. It was awesome! I didn't do anything differently, so I'm not sure what made them last, but I was so glad they did because they were freaking cute.


Aren't they fantastic?? So cute. I did three coats of a nameless hot pink Bon Bon polish (I probably could have gotten away with two coats had I been patient about it) and then one coat of one of my favorite glitter polishes (I use it all the time, seriously) OPI Pirouette My Whistle. Then on my thumb and ring fingers, I stamped the bow image from Pueen plate 29 with Sally Hansen XTreme Wear White On. I usually stamp with Sinful Colors Snow Me White, but I could not for the life of me get it to stamp properly. I had to redo my ring finger completely twice because it wouldn't work. So I used another, thinner white that I wouldn't use over anything darker. But I think it turned out great anyway! Let me know what you think. Thanks for reading, have a great day, and happy painting! :)

Monsters University/Monsters, Inc. Nails!!

HI! I'm super excited. Know why? Because of Monsters University. Yes, I know it came out a few weeks ago. That's okay, because I never showed you what I painted on my nails. So let's just pretend it's the night before the movie comes out, and we're getting our nails all ready for the movie premier...


Look at those cuties! For the record, Monsters Inc. is my favorite Pixar movie. And I really was beyond excited for Monsters University, which was fantastic!! And you know me, I love to have an occasion to paint my nails. These got a little flubbed, but that's okay, they were still awesome. On my thumb, I painted Randall Boggs (he's the dorkiest villain ever) using China Glaze Tart-y for the Party as my base color and mixing it with white for the lighter dots and using China Glaze Spontaneous for the darker dots. His eyes and glasses (which he wears in Monsters University) with acrylic paint. On my index, I painted Mike Wazowski using China Glaze Tree Hugger as the base color, and the rest was done with acrylic paints. I know he looks weird, but I wanted to paint young Mike from MU. On my middle finger, I painted James P. Sullivan (pffft, Sully) with a base coat of Sally Hansen XTreme Wear White On and then two coats of China Glaze Towel Boy Toy (his face, of course, was painted with acrylic paints). 

Now here's where it gets weird. I painted these before the movie came out, so I wasn't really sure what to expect. And I was also painting these at like 4 in the morning, so I got a little lazy. My favorite character in Monsters, Inc. is George Sanderson, and most of you probably don't know who that is. He's the monster who always managed to have the sock on him and the CDA (Child Detection Agency) guys had to shave him a lot. (23-19, 23-19!!) And I saw a picture that showed he was in Monsters University as well. Had I known that he didn't even have a speaking part, I probably would have painted someone else. But nevertheless, on my ring finger is George Sanderson. I used China Glaze Life Preserver as my base color, and his face and stripes were done with acrylic paints. And finally, on my pinky, is the Monsters, Inc. logo, which honestly has almost nothing to do with Monsters University. But it was 4 in the morning and I was lazy, so that's what happened. A better person would put the MU logo on there, or maybe one of the Greek Life symbols (like Oozma Kappa!) (A better person would also probably be asleep at 4 in the morning instead of rushing Monsters University nails).  But that's it, that's all it takes! Super easy. I did most of mine with a dotter tool. So let me know if you try it out, or if you like it! 

Thanks for reading, have a good day, and happy painting! :)

Dinosaur Egg/Rock Nails

Hey there! I have another design for you done on my little sister's nails. Her nails are much longer than mine, so I'll try to keep posting what I paint on her nails, so you can get both long and short nail designs. My sister wanted me to paint her nails to look like a rock that she has:


It's a rock, but it's called a dinosaur egg at the museum she got it from. This is what I came up with:


The base color is Sally Hansen XTreme Wear Black Out. I sponged a little bit of Ulta Concrete Evidence on the nail in random spots. Then I did the water spotted technique (where you start off the same as a water marble, except instead of doing multiple colors and swirling it around, you do a few drops of one color and then spray it with perfume or any other alcohol-based spray - it breaks the polish up on the water and makes it speckled like you can see there) with Funky Fingers Like Clockwork. The polish was the right color, but I wasn't using the right spray, so it ended up a little more chunky than it looks on the "egg." So if you try it out, don't use perfume. Maybe use spray hand sanitizer, or rubbing alcohol in a spray bottle. And of course, this can be done with any colors you like, I just used these colors because that's what my sister wanted. And if you're catching a glimpse of my nails in the third picture, I'm wearing OPI Can't Find My Czechbook with a single coat of Sephora Spark-tacular. I don't have a post for that because I seemed to have misplaced the pictures. So oh well! Maybe another day. Anyway, thanks for reading, have a great day, and happy painting! :)


Saturday, July 13, 2013

Wizard of Oz Nails

Hey there! So I have another very long, pic-heavy post for you. But it's worth it. I decided a while back that I wanted to paint my own Wizard of Oz nails, because I couldn't find too many tutorials or anything that was simple to paint and still represented the movie really well. Mine didn't turn out too simple, now that I think about it. But they still look pretty! And there's always ways to make it simpler if the design is too difficult.

The Emerald City - Well isn't that sparkly? Alright, I used like 7 polishes for this finger alone. So just bear with me, haha. The base color is China Glaze Bahamian Escape. Then I painted the Emerald City first with L'Oreal The Temptress' Power and then with stripes of Zoya Logan. Then I painted the yellow brick road with Sinful Colors Let's Meet. And for the poppies, I just dotted them in with China Glaze Pink-ie Promise, China Glaze Life is Rosy, and Sinful Colors Soul Mate. And finally I painted in the clouds and the brick lines on the yellow brick road with with and black acrylic paint.

Poppies - Poppies are some of my favorite flowers, and I couldn't resist giving them a nail all to themselves. I used a cup of mine that has a poppy design on it as a reference. The base color is China Glaze Pink-ie Promise. Everything else was done with acrylic paints.

The Wicked Witch of the West- Hey, she needs some love too! Instead of doing anything complicated, I just decided to do a witch silhouette. The base color is China Glaze Gaga For Green, and the witch was painted with black acrylic paint. It's much easier than it looks, because you can pretty much just push the acrylic paint in the design you want, if that makes sense. You don't have to be too precise since she's just a silhouette, is what I'm getting at.

The Flying Monkeys - Again, I didn't want anything too difficult. So instead of painting a full monkey, I went with their little outfits. The base color is China Glaze Bahamian Escape, and the rest was done with acrylic paints.

The Wicked Witch of the East - Her stockings! The base color is Sinful Colors Snow Me White and the stripes are black acrylic paint.


Here's a little picture of my workspace. You can see all of the polishes and paint I used - plus a few of my scribbles on paper before I painted it. I don't usually plan it out before I start painting, but this was different because I had multiple ideas floating around in my head for each nail, so I needed to draw them out. And if you look really closely, you can see that I wrote down some Batman characters, because I was originally going to do that before I finally settled on Wizard of Oz. I'm glad I changed my mind! :)

Dorothy - Her gingham dress! This is super simple, even if it doesn't look like it. The base color is China Glaze Dandy Lyin' Around. Then I painted overlapping stripes of light blue with acrylic paint. Then you just fill in the square parts where the stripes overlap with a darker blue (I used acrylic paint for this as well), violá! You have a simple gingham dress.

The Scarecrow - He was always my favorite character! The base color I used is e.l.f. Emerald, which was a little too dark for my taste. But I didn't have a dark green at the time, so it worked! The straw and rope are painted with acrylic paint.

The Tin Man - The base color is Sally Hansen XTreme Wear Celeb City and the heart and lines are painted with acrylic paints.

The Cowardly Lion - The base color is e.l.f. Nude and his main and red bow were painted with acrylic paint.


Even though you can see it in this picture, I guess I didn't get a close-up photo of my other pinky, which was the Ruby Red Slippers - The base color was China Glaze Hey Sailor and I went over it with two coats of Orly Rockets Red Glare (aka my favoritest glitter polish in existence). And there you have it! Wizard of Oz nails. They're sure to catch some eyes and get lots of compliments, because mine sure did! So let me know if you try them out, I'd love to hear from you! Thanks for reading, have a great day, and happy painting! :)