Showing posts with label nail polish. Show all posts

Thursday, January 30, 2014

KBShimmer "Clown Puke" Swatch

Alrighty, another indie! KBShimmer Clown Puke. Woohoo! I LOVE THIS ONE. So much. It was on my list of polishes that I need for a very long time. It's perfect in every way - So I'm super excited to show you my swatch! You know the drill by now, I'll show you the swatch first and then talk more about the polish afterward. :)


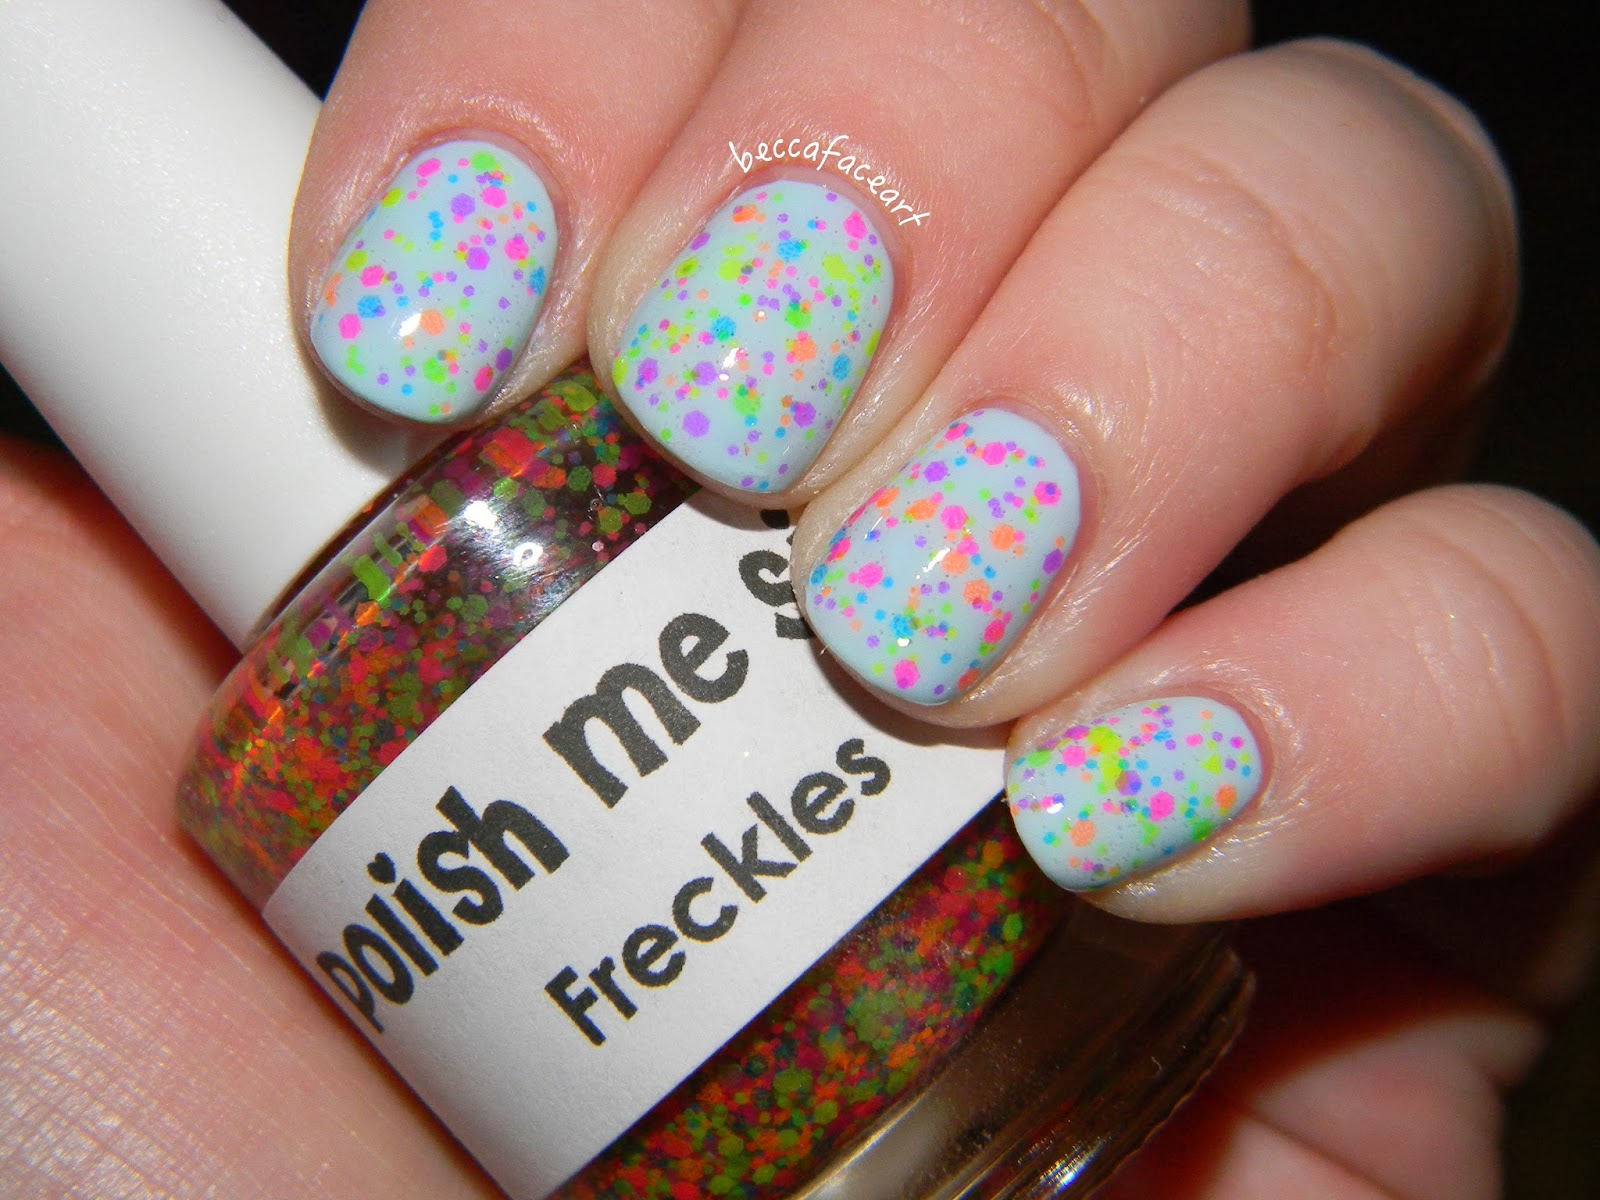
This is one perfect coat of Clown Puke over two coats of Essie Mint Candy Apple (I also tried it over my universal glitter base color, OPI Gargantuan Green Grape, and I didn't like it as much! So MCA it is.) This indie is loaded with glitter of every size in every shape - hex, square, circle, stars, hearts, you name it! And they're in every color!! My favorite glitters were the giant circle glitters, which you can just barely see one on my thumb in the first picture. It's so good. And like I said, this is one coat. It's so full of glitter. I had to do minimal placing of glitters as well, they just kind of fell where I wanted them to go. And the formula is fantastic, of course. Despite the sheer magnitude of glitter in this polish, it isn't thick at all. So basically, I give it a 10/10, would wear over and over again because it's perfect and beautiful.

I received this polish for Christmas, so my opinion is honest and hopefully it convinced you that you need this polish. Everyone needs it, for real. And if you feel that you need it as badly as I did, you can purchase it on KBShimmer's Etsy shop and their website.

So I hope you enjoyed! Thanks so much for reading, have a great day, and happy painting! :)


Thursday, January 9, 2014

Polish Me Silly "Freckles" Swatch

Heeeeeeeey, look at me go! After not updating at all for two months, I'm starting to get back into it. Mostly because I have a million pictures piled up on my hard drive that I need to sort through and edit, so by default I'm having to blog as well. But at least I enjoy it. :)

So today I have an awesome swatch for you - Polish Me Silly (formerly known as Lush Lacquer) Freckles! My friend Payton got me this indie polish for my birthday (waaaay back in October - see how behind I am?) and I practically wore it the second she gave it to me. So even though these pictures were taken a while ago when it was fall, the colors are better for winter and spring. Just like with my other swatch/review thingies, I'll show you the swatch first and then talk about the formula afterwards.


This is one coat of Freckles over three coats of OPI Gargantuan Green Grape - And yes, that's GGG. It's just the blue version, not the green version. I might do a comparison of that someday, because there are definitely two versions of GGG

Alrighty, on to the formula and my thoughts about Freckles. First of all, Freckles has tons of small neon blue, green, pink, purple, orange, and highlighter yellow glitters packed into it. And the formula is awesome! It's not too thick, and it has great glitter payoff. I think this polish is really unique as far as the glitter goes - I know plenty of indie brands have some form of neon glitters, but this is my first time experiencing one, and it was interesting to find that the glitters are actually transparent and ultra-thin, just like neon nail polish. They're made of a different material than regular glitters. I liked them a lot! The only problem with these glitters is that you really can't put them over a dark color, because then they'll be dull and a few different shades of swamp. So I tested Freckles over a few bright colors, and I found that it works best over white, very light blue, pastel green, light purple, and bubblegum pink (I specifically used Gargantuan Green Grape, OPI You're Such a Budapest, Fresh Paint Honey Dew, and OPI Chic From Ears to Tail). You only need one coat for a perfect spread of rainbow freckles on your nails! I give this a 10/10 would wear again and again and again.

Thanks for reading, have a great day, and happy painting! :)

Friday, January 3, 2014

Pipe Dream Polish "Pink Elephants and Lemonade" Swatch

Hello all! I've got an indie polish swatch for you today to start off the new year! :) I put several indie polishes (and a ton of other mainstream polishes too) on my Christmas list this year, and I got several of them, so I'll have swatches of all of them sometime in the next few weeks! But for today, I'm sharing one of the polishes I was most excited to wear - Pipe Dream Polish Pink Elephants and Lemonade.


According to the description at Pipe Dream Polish's store, Pink Elephants and Lemonade is "made up of medium and small hot pink and deep yellow matte glitters in a dusty turquoise crelly base." That is definitely an accurate description, because the base isn't really jelly - it's actually pretty opaque. But not so opaque that you can't see the glitters from the first coat if you do more than one coat. So I'll show you my swatches first and then I'll talk about the formula and my thoughts afterwards:

(two coats, indoors)

(two coats, indoors)

(two coats, flash)

Alrighty! So, I'm absolutely in love with this polish for tons of reasons. First things first: The colors! It isn't a secret by now that I love turquoise, and there's just something about turquoise and yellow and pink glitters... It spoke to me on a personal level. It's a unique blend, in my opinion. And let's not forget the name - Pink Elephants and Lemonade. It just reminds me of that song from Dumbo. "Pink Elephants on Parade," anyone? Anyway, the pink and yellow glitters are matte and they're surprisingly subtle. It just gives such a nice polka-dotty look to the polish. I would give this a 10/10 on color, because it's just so darn cute.

The formula... is awesome! No fishing required for those beautiful glitters! And the base is opaque enough that you don't need underwear or more than two coats. I think you could even get away with one coat, if you like that sheer jelly-look. You would have to paint it veeerrry carefully for one coat, though. It is a little streaky to begin with, but two coats evens it out perfectly. Some other awesome things about this formula are that it is super fast-drying and it's chip-resistant! Now, I don't actually know if it's either of those things, but from my experience with it, it dried so freaking fast. It was like Seche Vite fast. This isn't always a good thing, because a few times when I went back over a spot I had already painted it tended to drag a little bit - but like I said, a second coat evens it all out and leaves a gorgeous finish. It's also chip-resistant for me. I say that instead of "long-lasting" because I only just painted it on two nights ago, so I can't actually know that yet. But polish doesn't last long on my nails at all, and this hasn't chipped yet! I don't even have tip wear, which is just insane to me. I'm so impressed. So it's definitely an awesome formula. It was a little bit thick at first; I did add a little thinner to help move things along, but not much - just enough to make it buttery.

So overall, I love this polish. LOVE IT. It was a great price ($8 on their Etsy store, although it is on sale currently on their bigcartel store for $7), even though I didn't buy mine (I got it for Christmas from my wonderful mom :D). I'm not being compensated at all for this review/swatchfest, I just wanted to share it with you all. This indie polish holds a special place in my heart already, and I have a feeling I'm going to wear it a lot in the spring when it gets really rainy here in Georgia. It kind of reminds me of April rain showers, actually. It's dusty and muted, but the pink and yellow glitters look like flowers. So I hope you all enjoyed this looong review, and let me know what you think! I do have eight more indies to show you, so if there's anything specific that you would like me to talk about when I'm reviewing, let me know. I also have the three custom polishes I made for my friends and my sister - but I have to swatch those and fix up the pictures before I talk about them. Did you notice I changed my water-mark? That's something I want to work on this year - better quality pictures! 

Anyway, thanks for reading, have an amazing day, and happy painting! :)


Tuesday, October 22, 2013

Sephora Formula X Law of Attraction Swatch

Hi everyone! So before I get back into the Halloween designs, I need to share my birthday nails with you! So, technically yesterday (Oct. 21) was my 21st birthday, but I'm just getting this put up today. I tried to come up with a design for a really long time for my birthday, and in the end, it just didn't happen. I stumbled across Sephora Formula X Law of Attraction at Sephora, and it was love at first sight. And I bought it, and then I decided that that was my birthday polish. So here it is:

Bottle shot - this is the back of the bottle so you can see those beautiful indigo holographic glitters in there. Ugh, this is a perfect polish.


I painted one coat of Law of Attraction over two coats of OPI Don't Touch My Tutu. It needed some underwear, but I didn't want anything as stark as a white polish, so I went with a super sheer white, just to cover up the stain on my nails. Appearance-wise, this is the most beautiful polish I own. My picture doesn't do it justice. It's gold in every light, but once you get it outside, those indigo glitters flash a million rainbows and explode off your nails in a glorious shine. It is absolutely stunning. Formula-wise, it left something to be desired. I'd expect for a $14 polish, it should have an amazing formula, but it didn't. It's not hard to get the glitters where you want them to go, and it's certainly packed enough with glitter that I didn't have to fish or place too many. But it's just so ridiculously goopy. I had to thin it out before I even used it, because I knew it just wouldn't glide after testing it on a nail wheel. But once I thinned it, it turned into butter. Golden, rainbow indigo glitter-ridden butter. I think this polish would also be perfect for winter layered over white, but I'm not there yet. So, as far as the polish goes, 10/10, would buy again. The formula wasn't a problem for me once I thinned it out, so I don't mind. But the beauty makes up for it, because oh man. These were the sparkliest nails I've ever had. 

Anyway, I hope you like them! They weren't the most original birthday nails, but they were certainly the most glamourous. Thanks for reading, have a great day, and happy painting! :)

Saturday, March 16, 2013

Glowing Samurai Princess Nails

Hello again! :) I have had a busy week and couldn't finish catching up on my posts, but now I'm working on it. I guess we'll just never hear the end of me having to catch up on posts.

Anyway, after my last manicure I decided I wasn't done wearing Samurai Princess (for more info and a semi-review on it visit my last post), so I switched it up and used a different base color! One that GLOWS!


(indoors - sorry for the blur in the first picture!)

My base color is Bright Night by Blackheart Beauty. You may have seen these polishes if you visit Hot Topic regularly - they're the skull shaped bottles! Freaking awesome. I don't actually go to Hot Topic all that often, but I have wanted some glow in the dark polish for a really long time and they have a bunch of colors. This one was my favorite - bluuue! It's not the standard green or clear glow in the dark. This polish has a weird formula. It's pretty sheer - I used three coats. But it's kind of a thick jelly? It's really strange. I'm not sure if you can tell in the second picture, but after a day (I had to wait for daylight to take a picture) it starts to peel back a bit? But not entirely - just the pigment. There was still polish on the tips of my nails. Like I said, it was really weird. But fantastic anyway. Here's the glow:


SO COOL. My camera doesn't do it justice. It's waaaaay brighter in reality. And it charges under a lght very quickly, and lasts so much longer than you'd imagine. After experimenting, I even found that I could hold the flashlight on my iPhone right over it for a few seconds, and you could literally see my nails glow in full lighting. They looked radioactive! Freaking awesome.

Before you go off and get these polishes (because they are awesome and inexpensive), there is one more thing I want to mention. According to Hot Topic's website, these polishes contain lead. I don't want to alarm anyone! They are safe to wear, trust me. I wore it for a long time (and I also have worn some of their other polishes), and I haven't had anything happen to me. I just wanted to warn you in case you bite your nails, or you don't want to wear anything with lead in them (especially don't get this for kids). But the polishes contain a very small amount of lead, and they are safe to wear. I used a top coat over them, and I was able to eat and everything. So don't let that discourage you if you're interested in them, I just want you to have the facts. Because I did not know this before I bought and wore them.

Anyway, thanks for reading, have a nice day, and happy painting! :)


Tuesday, February 19, 2013

China Glaze Starboard Swatch

Hello again! Like I said in my last post, I'm just trying to catch up on everything I did with my nails the past several weeks. This time I just painted my nails one color, nothing special. But it was a very beautiful green China Glaze polish, called Starboard.


And here's where I tell you my camera bit the dust for a few weeks, so for the next few posts the pictures come to you from my trusty iPhone. The one thing I have to give to my iPhone is that I don't need to worry about it getting the color right as long as I take the pictures in the right lighting. These photos are really accurate to the color. The formula on this one is amazing, as most China Glaze cremes are. It was opaque in two coats for me, and it's just really lovely in general. It's strange - my favorite color has always been green, but I rarely wear green nail polish. I don't know why. This polish has convinced me that I need to change my ways! Green nail polish forever and ever!!

Ahem. Got a little carried away there. Anyway, thanks for reading, have a good day, and happy painting! :)