Showing posts with label orly. Show all posts

Sunday, August 10, 2014

Back again... and Mermaid nails! :)

Hello everyone! It's been a looooooooooong time. An indecent amount of time. And for that, I am so sorry. Really, I tried to keep up with it, but I've had some mental health problems over the summer (after the crazy semester from hell at school), and I just kind of... stopped caring about my nails. I did still keep them mostly painted, but I've neglected my cuticles and I didn't do any nail art whatsoever. This is something that I never wanted to happen, ever. I love painting my nails and blogging with you guys, and I was always afraid that I would just stop one day and not start back up again. Well, after a long summer and some time to get back up on the metaphorical horse, I'm back! Another semester in college is going to be starting for me next week, and I decided it was time to nip this little mood in the bud and get back into the groove of things. :) So. I have a few more things to say and then I'll show you some mermaid nails! :)

1) If you have been keeping track of my 31 Day Nail Art Challenge posts, I am sorry to say that I'm not going to be continuing that. It honestly was a mistake of me to try and take that on, because I just wasn't that dedicated to it from the get-go. That being said, I have a few designs in a folder on my computer that I did complete for the challenge, but never posted. So I'll post those, but they won't be part of the challenge, because maaaaan. Forget that challenge *z-snap*.
2) And this brings me to my next point. I have several designs that I never posted from back in March-May. I will probably post some of those, because I like them and they're still nice designs... they're just a few months old, haha. So you will probably see those for the next few posts before any actually recent designs.
3) And finally, as you all know, I obviously have a problem with how long my posts are. I talk too much. As such, I'm going to try and keep them AS CONDENSED AS POSSIBLE in the future. For real. For designs, I might just say what polishes/stamps/paints I use and maybe elaborate a teeny tiny bit (an example will be below for the mermaid design). For reviews of polishes (such as indie polishes and swatches and things like that), those will be longer. But I honestly have to get a grip on the length of my posts, it's ridiculous.

With that, I just want to thank all of you for being patient with me, and for being amazing in general. :) You're wonderful and I am excited to come back to blogging because you all make it fun! And now, on to the nail art~~~~~~~~~ WOOOSH


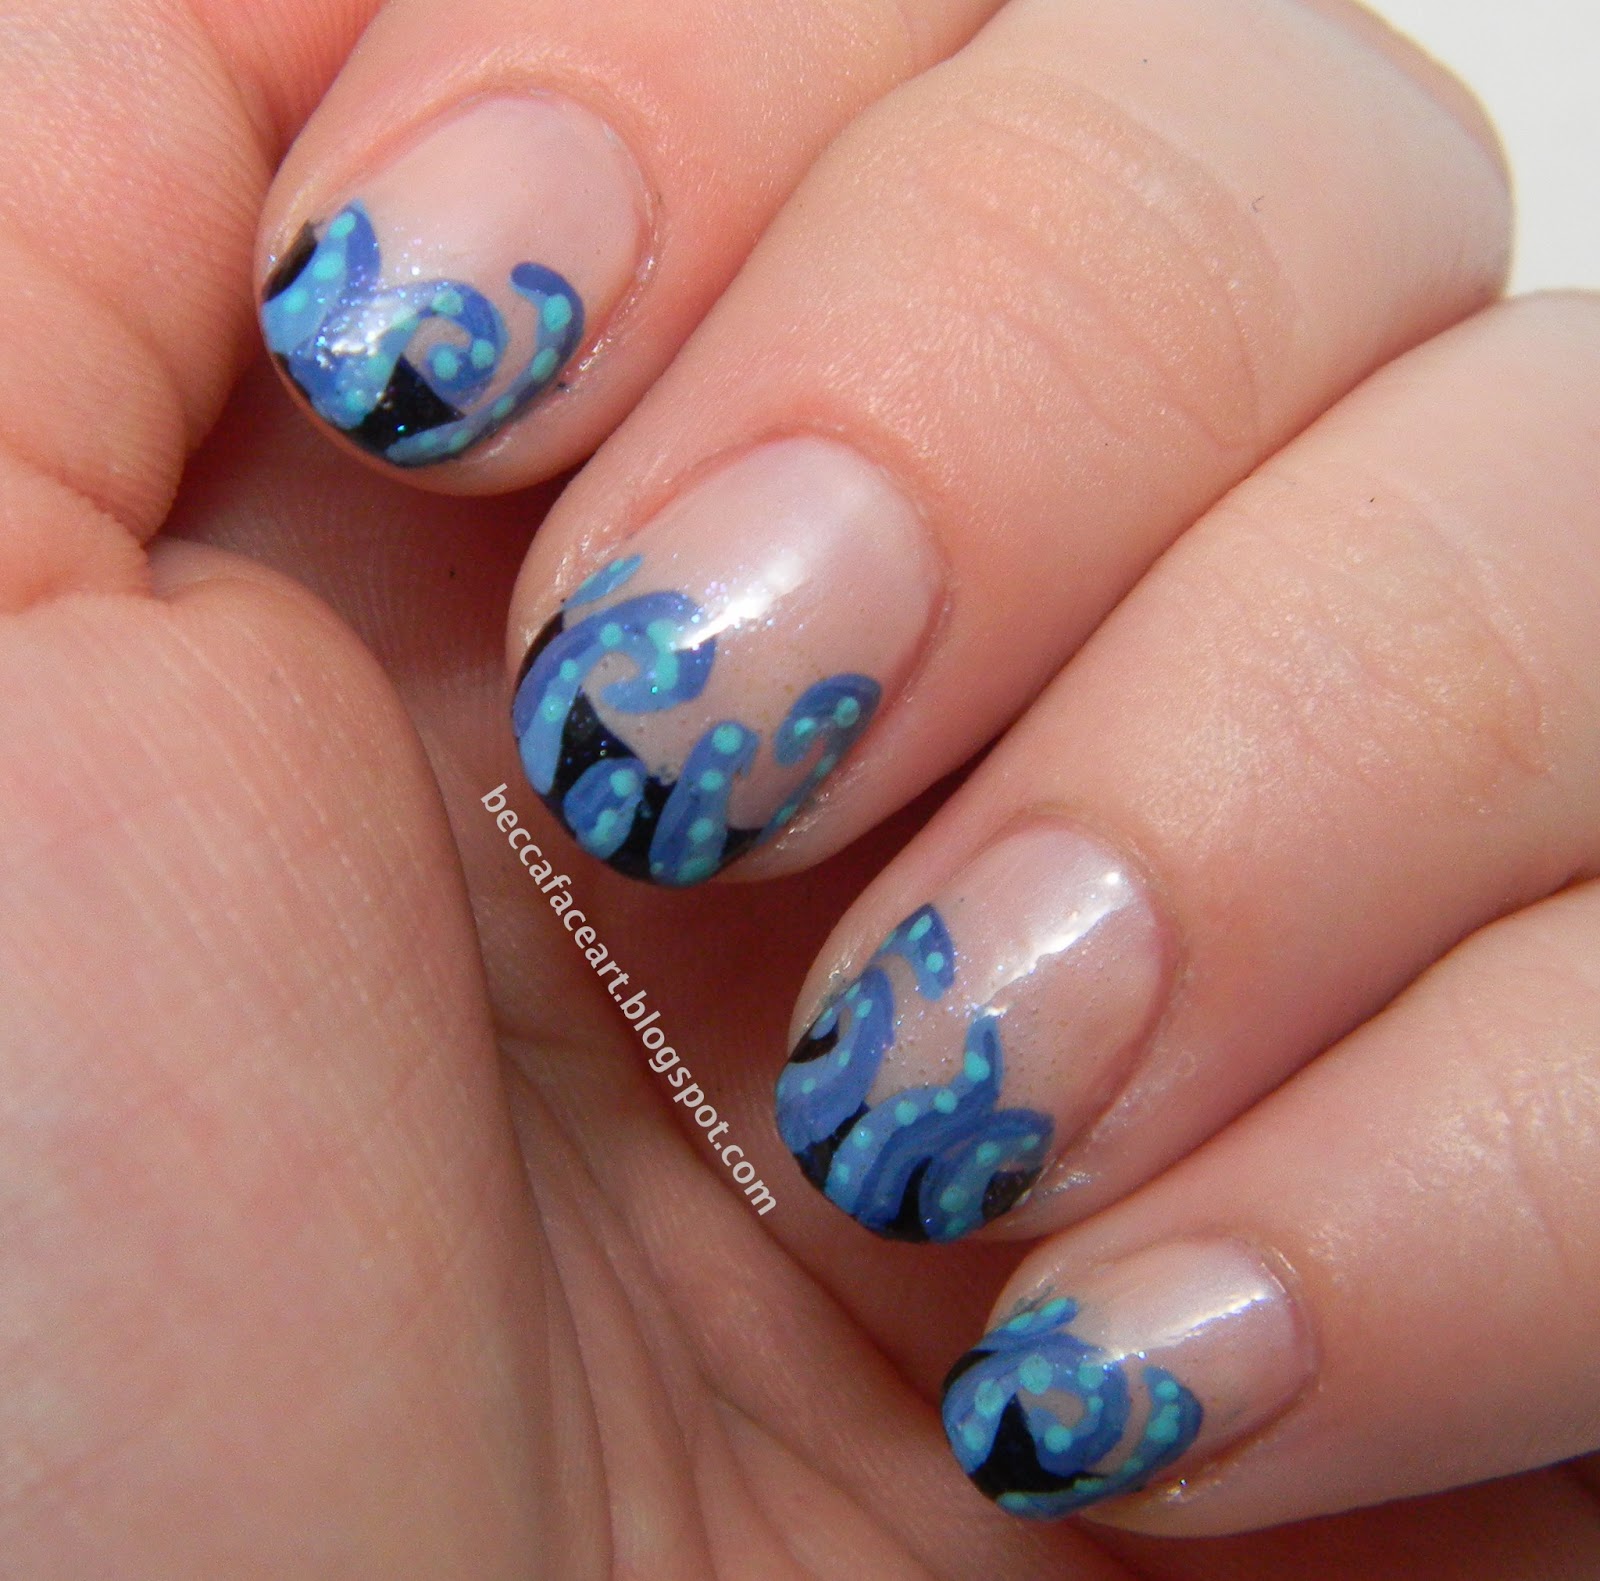
Meeeermaaaaiiidssssss! I love mermaids, I think they're great. And they're the perfect summer manicure!

Base color: China Glaze Keep Calm, Paint On
Stamp colors: (gradient - from cuticle to nail tip) China Glaze Fancy Pants, Spontaneous, and Tart-y for the Party
Stamp: Mash Stamp Plate 39
Glitter: Orly Mermaid Tale

I really like for the scales to stand out, so I picked Keep Calm, Paint On as my base color because it's very pale and accepts other colors well. And the scales are all colors that look great together. The whole look is very shimmery and the glitter (only painted around the edges) gives a lovely rainbow pop on your nails. It's a subtle design but it's very eye catching! :) I hope you like it as much as I do!

Let me know if you have any questions or concerns, and let me know what you think of the new way of doing these posts. As in, do you prefer me to type everything out and keep my posts longer, or would you prefer me to list my supplies and keep it simple? I'd love to here from you about this. I just want to thank you again so much for reading, it absolutely means the world to me! Have a great day, and happy painting! :)


Tuesday, January 28, 2014

31 Day Nail Art Challenge! Day 22: Inspired by a Song

Hey all! I have an idea for a new series of nail art that I want to do (and I’m excited to get started on it) but I realized that I really need to finish posting all of the 31 Day Nail Art Challenges before I can start on a new thing. So it’s going to happen, I’m in the last stretch!!

So for today, I have the “Inspired by a Song” challenge – I chose “Cough Syrup” by Young the Giant. I dunno, I guess I just wanted to have a good cry while I painted my nails. But I also thought it was descriptive and I liked the design I came up with for it.


I knew I was going to paint some more detailed designs, so I wanted a neutral background. I painted two coats of Orly Déjà Vu on all of my nails, and then I used acrylic paints for all of the art, just because it was easier to shade with craft paint than with nail polish. On my thumb, I painted a drum for the line “A wet world aches for a beat of a drum.” On my index, I painted a spoon of cough syrup for the line “One more spoon of cough syrup now.” On my middle finger, I painted the words “Losing my mind” for that very same line, haha. I used different shades of a pinkish-purple to make it look like a gradient, even though there was no actual blending involved. On my ring finger, I painted a zombie and a realistic heart for the line “These zombies in the park, they’re looking for my heart.” And finally on my pinky, I painted a “Splash of the sun,” which unfortunately looks like a sad sunny side up egg. I intended for it to look like a splatter spot sun, but it’s the thought that counts. J

So that’s it! I hope you like it! Thanks for reading, have a great day, and happy painting! J

Tuesday, December 31, 2013

I'm a liar! And two New Year's Eve designs for you...

Hello all! Yes, I am a liar. I said I would have a lot of holiday designs and I was going to be posting regularly again and whatnot, and it just didn't happen. Technically I did have several holiday designs, but I just never posted them. I'm still trying to decide if I want to post them or just wait until next year. It's been a hectic month. You know? Sometimes things just suck and it was one of those times for me, so I hope you're not too upset. I'm sorry that I'm failing, haha. But I hope that these two mani's make up for it! These would be great for a New Year's Eve party! :)


This is a super simple manicure - just black and silver textured polish! It's super chic and would be perfect for celebrating the new year. Here I've used two coats of OPI It's Frosty Outside on my thumb and ring finger, and three coats of OPI Emotions on my index, middle, and pinky fingers. 


And here's a slightly more complex design for those of you who like a little more out of your mani's - I'm wearing this design right now for my party/get-together tonight. (I apologize for the picture, I ended up taking the picture on my iPhone because I got fed up with the bad quality my camera was giving me.) On my thumb, middle, and pinky fingers I did two coats of Wet n' Wild Black Creme with a gold round stud on each. Then on my index, I painted two coats of OPI Louvre Me Louvre Me Not, which is one of my all time favorite OPIs. Such a great polish. And on my ring finger, I did two coats of Essie Good As Gold, with a coat of "So This Is Love" over it. "So This Is Love" is one of the custom polishes I made for my friends as their Christmas presents this year, so don't worry, there will be a full post about that polish coming up soon! Since you won't have that polish, a good substitute would be Orly Ridiculously Regal. And of course, you can always use gold polish and a dotter tool instead of studs.

Alrighty then! I hope you enjoyed the designs! And if I don't post again between now and 2014, I just want to say thank you so much for reading and sticking with me while I struggle through blogging, haha. I'm going to try a ton of new things in the new year, new things that I hope will allow me to post regularly and keep blogging fun instead of making it seem like a chore to me. I never wanted it to get that way, so hopefully the new things I'm going to try will spice it up and keep the nail art good for all of you as well. And I hope you all have an amazing New Year's Eve, and have an amazing time bringing in the new year. Thanks for reading, have a fantastic day, and happy painting! :)

Thursday, October 24, 2013

Halloween Rotten Pumpkin Nails!

Hello all. :) Halloween isn't Halloween without some pumpkins, right? So I painted pumpkins.... rotten pumpkins!!


(Sorry this picture is blurry! But I wanted a shot of my thumb)

Yes, I know... they're kind of disgusting. But I think they're gross in an endearing way. So, on my index, middle, and pinky nails, I painted one coat of Wet n' Wild Black Creme, and then one coat of Orly R.I.P. On my accent nails, I painted one coat of China Glaze Life Preserver and then one coat of Sinful Colors Cloud 9 to give it some shimmer and add dimension to the color. Now comes the fun part... making them look rotten! Since R.I.P. has a black jelly base, I just took it and wiped as much of the polish as I could on the lip of the bottle, then I lightly streaked it over the orange. Since it's really sheer, it just left these dirty streaks. The best way to replicate this without that specific polish is to mix a little bit of black nail polish with clear polish on a palette or a piece of paper and then streak that over your nails. Or you could even use a darker shade of orange. Whatever you've got! Then I took a black striper polish and painted on the faces wit thin, short, and fast lines. So I hope you like it! Let me know if you try it out. :)

Thanks for reading, have a great day, and happy painting! :)

Tuesday, October 15, 2013

Depression Awareness Month Nails

Hello all! So, October is pretty much known for three things: Halloween, having the best weather out of all the months, and breast cancer awareness. But did you know that October is also Depression Awareness month? Well, now you do. Here is a fantastic webpage that should give you a good idea about how prevalent depression is. I personally know people who suffer with depression and I have experienced it myself. It's much more serious than just feeling sad - it's feeling sad, and angry, and exhausted, and unmotivated, hopeless, and helpless. It's thinking you're worthless and that no one can help you. It's becoming uninterested in your favorite things - mine was drawing and painting. Depression is serious and deserves the awareness. So I went around like a fairy wearing my green nails (because the depression awareness ribbon is emerald green) educating people about depression and how to help those who have it! But I'm not going to do that here - just know that people with depression are not making it up and it's not nearly as simple as "just being happier." It is an illness that needs treatment, and it affects real people who need understanding and acceptance. So here's what I did:


On my left hand (thumb to pinky): Sinful Colors Envy and Orly Mermaid Tale, China Glaze Tree Hugger, Zoya Logan, Sinful Colors Innocent and China Glaze Graffiti Glitter, and Sinful Colors Happy Ending.


On my right hand (pinky to thumb): Sinful Colors San Francisco, China Glaze Gaga For Green and Sinful Colors Call You Later, China Glaze Starboard, China Glaze I'm With The Lifeguard, and China Glaze Cast A Spell.


I basically took all my green polishes and used them, haha. Green makes me very happy, and it was helping me represent a cause that is important to me. Sounds like a perfect manicure! So I hope you like them. Thanks so much for your awareness, and feel free to share your experiences! Thanks for reading, have a great day, and happy painting! :)

Sunday, October 13, 2013

Halloween Witch's Brew/Magic Slime Nails

Wooo, I'm on a roll today! It's just because I've already painted all these designs, I just didn't upload them the day I did them. Sigh, my blog is just a perpetual mess. Anyway, here is my Witch's Brew/Magic Slime (I couldn't decide which name fit it better) design:


I don't think I meant to, but I managed to get all the most obnoxious Halloween colors in it? But I love it!! My base color is Sinful Colors Cloud 9. Then I took China Glaze Grape Juice and dotted it along the tips in a dripping pattern. It wasn't sparkly enough for me, so then I covered it with a purple glitter from Love & Beauty (Forever 21's brand) - I have no idea what the name of it is, because my bottle has no label. But I tried googling it, and I've seen it called Cauldron? Or it could just be Purple Glitter. I'm not sure. If you know what it's called, please let me know. Anyway, over that, I put Icing Love It and Orly Mermaid Tale for some magic bits (glitter, basically). And then, to make it even more spooky, I stamped the spider image from MASH plate 38 with Sinful Colors Innocent on my accent nails. Whew, that's a lot. But lemme tell you... They were so Halloween. They screamed Halloween. So I hope you like them! Let me know what you think. :)

Thanks for reading, have a wonderful day, and happy painting! :)

Thursday, October 10, 2013

Halloween Ghostie Nails!

Hi there! So now I'm finally getting into my Halloween nail designs (unless you count the princess nails, because that would be the start then). I'm going to have quite a few, I hope, but I somehow managed to get a late start on them. I just couldn't decide on what I wanted to do. But then a little voice in the back of my head spoke to me... "Paint ghosties.... paaaiiinnnttt ghooooossttiiiiieeeessssss~"


These were so much fun, even though they took me forever to paint. I started with a base coat of Sally Hansen Black Out on my thumb, index, middle, and pinky fingers, and then I did one coat of Orly Green Flakie Top Coat (yes, that's the name of it. Not very creative, Orly) over the black, which gave it just a little bit of pizazz under the ghosts. It's a combination of blue and purple flakie glitters, perfect for a Halloween design. On my ring finger, I did two coats of Sally Hansen White On. Then I painted the ghosts with white and black acrylic paint. Oh, and did I mention these babies GLOW??


Super rad, right? I used glow-in-the-dark acrylic paint for a single ghost on each nail, with the exception of my ring finger, which just needed to completely glow. So I hope you like them! Of course, you can try this design a bunch of different ways. You could paint all your nails black (with optional flakie topcoat, because I know not everyone is going to have it) and just have the swirly ghosties, or you could have the "evil" ghost face (because lesbehonest, he's not very evil) on your accent nails. You could also have all the ghosts be glow-in-the-dark! They looked way cooler, because the paint was transparent and you could see the flakie colors underneath them. Let me know if you try them out. Also, if you have any requests for Halloween designs, tell me! I'll be glad to try things out. :)

Thanks so much for reading, have a great day, and happy painting! :)

Tuesday, October 8, 2013

31 Day Nail Art Challenge! Day 18: Half Moons

Hello there! I'm going to keep it short and sweet today - It's half moon time!


I started with a base coat of Sally Hansen Insta-Dri Petal Pusher (what a mouthful) and then did two coats of Orly Déjà Vu. Looking back on it, it might have worked better if I did two coats of Petal Pusher and one coat of Déjà Vu. But oh well. Then I thinned out China Glaze First Mate and free-handed the half moons with my teeny tiny paint brush. It was not as difficult as I thought it would be, but it would probably be easier if I had used a guide or a hole protector. Regardless, the blue shimmer in Déjà Vu went really well with First Mate. So I hope you like them! It's not anything crazy, just something simple for this challenge. Thanks for reading, have a great day, and happy painting. :)

Saturday, July 27, 2013

31 Day Nail Art Challenge! Day 1: Red Nails

Hi there! So, you can probably guess from the title what this post is about. I've been struggling with art-block for a little while now, unless it's some kind of event or movie I'm going to. So to challenge myself, I'm going to start the 31 Day Nail Art Challenge! It'll be fun, and I have plenty of designs to go with. Of course, I don't paint my nails every day, so it won't be a 31 consecutive day kind of thing. It'll probably span several months, and I'll have other designs in between if I'm going to some event or if inspiration strikes me suddenly. But anyway, here's the list:


So Day 1 is Red Nails! Honestly, I had something much more detailed in mind, but I had almost no time to paint my nails, so I had to go with something simple. Of course, I could always go back and do the detailed design now that I do have time, but I'm lazy and I don't really want to wear red for too much longer. So I'm sticking with this one.


See? It's pretty simple. I did two coats of China Glaze Surfin' For Boys (which is definitely a neon red in reality, but it kind of looks coral in photos) and then went over it with one coat of Orly Rockets Red Glare, which is one of my all time favorite glitters. It's so perfect. I was worried that the glitter, which is a basic red, wouldn't match the base color, but I think it works perfectly! It actually reminds me a lot of watermelon, for some reason. But it's both great for summer and it satisfies the first day of the 31 Day Nail Art Challenge! :) 

As for the rest of the challenges, I have several designs planned out already, and the only one I'm worried about is the water marble. I am terrible at water marbling, and I've been practicing forever. So I will be attempting the water marble, because that's the very definition of a challenge... but I don't think I'll enjoy it. But I promise I'll have fun with the rest of it! So thank you for reading, have a great day, and happy painting! :)


Friday, July 19, 2013

Tentacle French Tip Design... Inspired by Robin Moses! :)

Hi there! So, I don't know if you know who Robin Moses is, but you should. She's on YouTube, and she's probably one of the most creative and talented nail artists out there, and you should go watch her videos. She did one design that I absolutely loved, so I decided I had to recreate it! Here's a link to her video. And here's what I created based on that:


Alrighty, so here's what I did. I started with two coats of Orly Déjà Vu and then made a french tip with the dark blue end of Revlon Moon Candy Galactic. Then I used acrylic paints (two different shades of blue and a light teal for the suction cups) for the tentacles. I went for a more literal approach whereas Robin made more abstract tentacles. She also used an opal polish to make the tentacles two-toned, but I don't own any opal polish so I substituted with a darker shade of blue paint. Then I went over the tentacles with a quick swipe of OPI I Juggle... Men. It gave it the slightest sparkle and definitely made it elegant. So I hope you like it! And definitely check out Robin Moses, because she's incredible and she's much better at this than I am. Thanks for reading, have a nice day, and happy painting! :)

Saturday, July 13, 2013

Wizard of Oz Nails

Hey there! So I have another very long, pic-heavy post for you. But it's worth it. I decided a while back that I wanted to paint my own Wizard of Oz nails, because I couldn't find too many tutorials or anything that was simple to paint and still represented the movie really well. Mine didn't turn out too simple, now that I think about it. But they still look pretty! And there's always ways to make it simpler if the design is too difficult.

The Emerald City - Well isn't that sparkly? Alright, I used like 7 polishes for this finger alone. So just bear with me, haha. The base color is China Glaze Bahamian Escape. Then I painted the Emerald City first with L'Oreal The Temptress' Power and then with stripes of Zoya Logan. Then I painted the yellow brick road with Sinful Colors Let's Meet. And for the poppies, I just dotted them in with China Glaze Pink-ie Promise, China Glaze Life is Rosy, and Sinful Colors Soul Mate. And finally I painted in the clouds and the brick lines on the yellow brick road with with and black acrylic paint.

Poppies - Poppies are some of my favorite flowers, and I couldn't resist giving them a nail all to themselves. I used a cup of mine that has a poppy design on it as a reference. The base color is China Glaze Pink-ie Promise. Everything else was done with acrylic paints.

The Wicked Witch of the West- Hey, she needs some love too! Instead of doing anything complicated, I just decided to do a witch silhouette. The base color is China Glaze Gaga For Green, and the witch was painted with black acrylic paint. It's much easier than it looks, because you can pretty much just push the acrylic paint in the design you want, if that makes sense. You don't have to be too precise since she's just a silhouette, is what I'm getting at.

The Flying Monkeys - Again, I didn't want anything too difficult. So instead of painting a full monkey, I went with their little outfits. The base color is China Glaze Bahamian Escape, and the rest was done with acrylic paints.

The Wicked Witch of the East - Her stockings! The base color is Sinful Colors Snow Me White and the stripes are black acrylic paint.


Here's a little picture of my workspace. You can see all of the polishes and paint I used - plus a few of my scribbles on paper before I painted it. I don't usually plan it out before I start painting, but this was different because I had multiple ideas floating around in my head for each nail, so I needed to draw them out. And if you look really closely, you can see that I wrote down some Batman characters, because I was originally going to do that before I finally settled on Wizard of Oz. I'm glad I changed my mind! :)

Dorothy - Her gingham dress! This is super simple, even if it doesn't look like it. The base color is China Glaze Dandy Lyin' Around. Then I painted overlapping stripes of light blue with acrylic paint. Then you just fill in the square parts where the stripes overlap with a darker blue (I used acrylic paint for this as well), violá! You have a simple gingham dress.

The Scarecrow - He was always my favorite character! The base color I used is e.l.f. Emerald, which was a little too dark for my taste. But I didn't have a dark green at the time, so it worked! The straw and rope are painted with acrylic paint.

The Tin Man - The base color is Sally Hansen XTreme Wear Celeb City and the heart and lines are painted with acrylic paints.

The Cowardly Lion - The base color is e.l.f. Nude and his main and red bow were painted with acrylic paint.


Even though you can see it in this picture, I guess I didn't get a close-up photo of my other pinky, which was the Ruby Red Slippers - The base color was China Glaze Hey Sailor and I went over it with two coats of Orly Rockets Red Glare (aka my favoritest glitter polish in existence). And there you have it! Wizard of Oz nails. They're sure to catch some eyes and get lots of compliments, because mine sure did! So let me know if you try them out, I'd love to hear from you! Thanks for reading, have a great day, and happy painting! :)


Sunday, April 28, 2013

Mario Bros. Nails

Hi there! Long time no see! I've been really busy at school and I just got a few new games for my Xbox (aka Bioshock Infinite and stay tuned for that nail design in a few weeks once I'm done with school!) and yeah. I guess what I'm trying to say is that I couldn't be bothered to finish updating my posts. But I'm going to try and do that today! Again. I'll try not to be so wordy in posts so they don't take me so long. And of course, I'm saying this on this post, which is probably going to be really long. Because Mario Bros. nails!!

(indoors)

I started with these base colors - I made sure the two green nails weren't right beside each other, because it would have bothered me, but you can do it in whatever order you want:

(From thumb to pinky - China Glaze Starboard, Sinful Colors Soul Mate, Starboard again, Wet n' Wild Red Red, and Sinful Colors Snow Me White)

Then I used acrylic paints for the details. I used white paint for Luigi's hat:

(Bonus Luigi! He's my absolute favorite!)

For Princess Peach's dress on my index, I used a darker pink, yellow, and I topped her little amulet decoration with Orly's Spazmatic:


For Bowser's shell (hopefully you can tell it's Bowser, not many people could) on my middle, I mixed together a light yellow and a reddish orange for his spikes:


For Mario's hat on my ring, I used white paint, just like Luigi:

(Sorry for the blurry picture! I think I was in a hurry when I was taking these!)

Finally, Toad was on my pinky! I just used a plain old, garden variety red paint for his spots:

(Again, blurry??)

I did the same characters/designs on my right hand, but I switched Mario, Luigi, Peach, and Bowser around. And like I said, I used acrylic paints, but I think you could also use polishes! And if you don't have paint brushes, you could probably use toothpicks/dotting tools. Although if you're using a dotting tool, you may need to use the smallest one you can find. But this design was super fun, and I really wish it had lasted longer! I'm a huge fan of pretty much all Nintendo games, but I just needed a Mario Bros. pick me up in the middle of the semester! So let me know if you want to try it out or if you have any questions!
Thanks for reading, have a good day, and happy painting! :)