Showing posts with label l'oreal. Show all posts

Saturday, July 13, 2013

Wizard of Oz Nails

Hey there! So I have another very long, pic-heavy post for you. But it's worth it. I decided a while back that I wanted to paint my own Wizard of Oz nails, because I couldn't find too many tutorials or anything that was simple to paint and still represented the movie really well. Mine didn't turn out too simple, now that I think about it. But they still look pretty! And there's always ways to make it simpler if the design is too difficult.

The Emerald City - Well isn't that sparkly? Alright, I used like 7 polishes for this finger alone. So just bear with me, haha. The base color is China Glaze Bahamian Escape. Then I painted the Emerald City first with L'Oreal The Temptress' Power and then with stripes of Zoya Logan. Then I painted the yellow brick road with Sinful Colors Let's Meet. And for the poppies, I just dotted them in with China Glaze Pink-ie Promise, China Glaze Life is Rosy, and Sinful Colors Soul Mate. And finally I painted in the clouds and the brick lines on the yellow brick road with with and black acrylic paint.

Poppies - Poppies are some of my favorite flowers, and I couldn't resist giving them a nail all to themselves. I used a cup of mine that has a poppy design on it as a reference. The base color is China Glaze Pink-ie Promise. Everything else was done with acrylic paints.

The Wicked Witch of the West- Hey, she needs some love too! Instead of doing anything complicated, I just decided to do a witch silhouette. The base color is China Glaze Gaga For Green, and the witch was painted with black acrylic paint. It's much easier than it looks, because you can pretty much just push the acrylic paint in the design you want, if that makes sense. You don't have to be too precise since she's just a silhouette, is what I'm getting at.

The Flying Monkeys - Again, I didn't want anything too difficult. So instead of painting a full monkey, I went with their little outfits. The base color is China Glaze Bahamian Escape, and the rest was done with acrylic paints.

The Wicked Witch of the East - Her stockings! The base color is Sinful Colors Snow Me White and the stripes are black acrylic paint.


Here's a little picture of my workspace. You can see all of the polishes and paint I used - plus a few of my scribbles on paper before I painted it. I don't usually plan it out before I start painting, but this was different because I had multiple ideas floating around in my head for each nail, so I needed to draw them out. And if you look really closely, you can see that I wrote down some Batman characters, because I was originally going to do that before I finally settled on Wizard of Oz. I'm glad I changed my mind! :)

Dorothy - Her gingham dress! This is super simple, even if it doesn't look like it. The base color is China Glaze Dandy Lyin' Around. Then I painted overlapping stripes of light blue with acrylic paint. Then you just fill in the square parts where the stripes overlap with a darker blue (I used acrylic paint for this as well), violá! You have a simple gingham dress.

The Scarecrow - He was always my favorite character! The base color I used is e.l.f. Emerald, which was a little too dark for my taste. But I didn't have a dark green at the time, so it worked! The straw and rope are painted with acrylic paint.

The Tin Man - The base color is Sally Hansen XTreme Wear Celeb City and the heart and lines are painted with acrylic paints.

The Cowardly Lion - The base color is e.l.f. Nude and his main and red bow were painted with acrylic paint.


Even though you can see it in this picture, I guess I didn't get a close-up photo of my other pinky, which was the Ruby Red Slippers - The base color was China Glaze Hey Sailor and I went over it with two coats of Orly Rockets Red Glare (aka my favoritest glitter polish in existence). And there you have it! Wizard of Oz nails. They're sure to catch some eyes and get lots of compliments, because mine sure did! So let me know if you try them out, I'd love to hear from you! Thanks for reading, have a great day, and happy painting! :)


Thursday, June 27, 2013

Bioshock Infinite Nails - Part 2 (Big Baddies)

Hurhur, see what I did there?? ...No? Just me? Oh well. Big Baddies is a pun off of one of the creatures from the first two Bioshock games - Big Daddies. But that's not what I painted, I painted the bad guys from Bioshock Infinite! Same as in Part 1, this post is going to be long and pic-heavy. But it's freaking awesome, so you won't even notice how long it is!!

So for this post, I'm showing you my left hand. Since I was able to paint it with my dominant hand, the difficulty for these is pretty high. But you're welcome to try them! It took me a few hours to paint all ten nails.

For my base colors, I did two coats each (three coats for my index). Thumb to pinky: China Glaze First Mate, China Glaze Ride the Waves, L'Oreal Notting Hill Blues, First Mate, and Notting Hill Blues again.
For all of the following designs, I used acrylic paints, so I'm not going to say specifically what I did. So we can save some time! We'll start with my pinky. I painted the Siren!

All I used for this one was white acrylic paint, since the Siren is a ghost. In the game, she's just blue and white. And she's absolutely the hardest baddie to beat in the game, in my opinion.

On my ring finger, I painted a Boy of Silence. In the first two Bioshock games, there were security cameras around every corner, and you either had to destroy them or hack them in order to not get caught. In Bioshock Infinite, the Boys of Silence replace them. When they see you, their mouths open, they explode, and the explosion reanimates a bunch of dead people who then attack you. What a drama queen!

This is my absolute favorite, I was so proud of it. This is a Motorized Patriot head. The Motorized Patriot is exactly what it sounds like - it's a George Washington robot with a crank gun that has flags and gears sticking out of his back. And the entire time he's shooting you, he's spouting phrases about Colombia (the city the game is set in) and being loyal to the Prophet (the leader of Colombia). I honestly think they're the most terrifying creatures in this game, because the more you shoot them, the more broken their patriot mask becomes. Eventually the mask falls off and there's just a metal skull a la Terminator left behind. AND IT'S STILL ATTACKING YOU. 

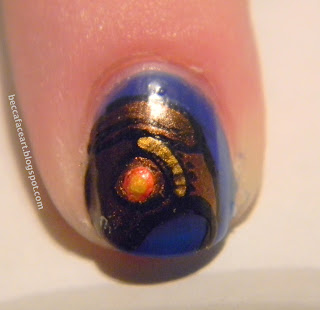
On my index, I painted Songbird. Songbird is a giant robotic bird (at least I think he's robotic, he could be alive) that protects Elizabeth (the incredible, powerful, female character who kicks butt and is way more intelligent and interesting than Booker DeWitt). Ahem. But Songbird is freaking awesome, with his scary red eyes.

And finally, on my thumb, a Handyman hand! I'm not entirely sure what a Handyman is, if I'm being honest. In the pre-production of the game, the creators said the Handyman would have a tragic background, but it was eventually cut from the game before it was released, and I think that left a little disconnect with the character. Basically, he's another giant robot - except he's a cyborg. He has a human head and a human heart, and he has some semblance of emotions, because early in the game he's seen crying and he's afraid of a camera flash. Regardless of a backstory, he's really tough to beat. 

So once you put all of those together, this is what you get:


(Sunlight)

So that's it for part 2! If you haven't already, check out part 1 for designs based on the Vigors from Bioshock Infinite. And also if you haven't already, play the Bioshock games! They are absolutely incredible, one-of-a-kind, immersive games. Actually, they're not just games, they're experiences. So go do it, you won't regret it. Anyway, thanks so much for reading, have a good day, and happy painting!! :)