Wednesday, October 15, 2014

Little Ghostie Nails

Hi all! Here's my first Halloween design for this year. It's subtle and requires absolutely no work other than painting a base color and putting a sticker on. :)


I thought this sticker was absolutely adorable and it looked really great over a dark color! I thought the sticker was white, but it turned out to be slightly translucent. A fantastic surprise!

My base color is China Glaze Howl You Doin', which came out in their 2013 Halloween collection. It's a beautiful, deep plum base with orange and purple glitters in it. It definitely looks almost-black indoors, but you can see the glitter once you go outside and it's stunning. I decided it was just witchy enough to put the sticker over. :) The nail sticker came in a small Halloween pack that I got from Five Below. I don't have the packaging any more (my bad), but here's what they look like:


Surprisingly the sticker lasted for several days until I was ready to take that design off! Anyway, I hope you like it! There are more designs to come, and they are much more complex. Thanks for reading, have a great day, and happy painting! :)


Story time!

Hey there! Yes, it's story time again. So, I had planned on keeping this blog updated and whatnot, blah blah blah. But right after I said that, I found out that my SD card slot on my computer decided to stop working. After many fights and home remedies with the SD card slot, I have decided that it's never going to work again ever. So. That means that I can't get the pictures off my camera, because there's no way for me to plug it directly into my computer. And yes, I'm planning on getting a card adapter, since my USB ports work just fine. Unfortunately in the meantime, that meant that I just couldn't post since there was no way for me to get my pictures. I had accepted this fact up until now, because it's October. And you know how much I love my Halloween nails. Plus, my birthday is in a week, and I just need to start posting again!

My solution for this problem is that I will be posting several Halloween designs, but the only other camera I have is my iPhone 5S. Sigh. So the pictures won't be the best, but they're better than no pictures? I hope? I've already worn a few Halloween designs, so I'm going to be posting them tonight and in the next few days. Since my birthday is in a week, hopefully I'll get some money for a card adapter and we can return to our regularly scheduled blogging. :)

Thanks so much for reading and keep an eye out for the Halloween designs! Have a great day and happy painting! :)

- Faith

Thursday, August 14, 2014

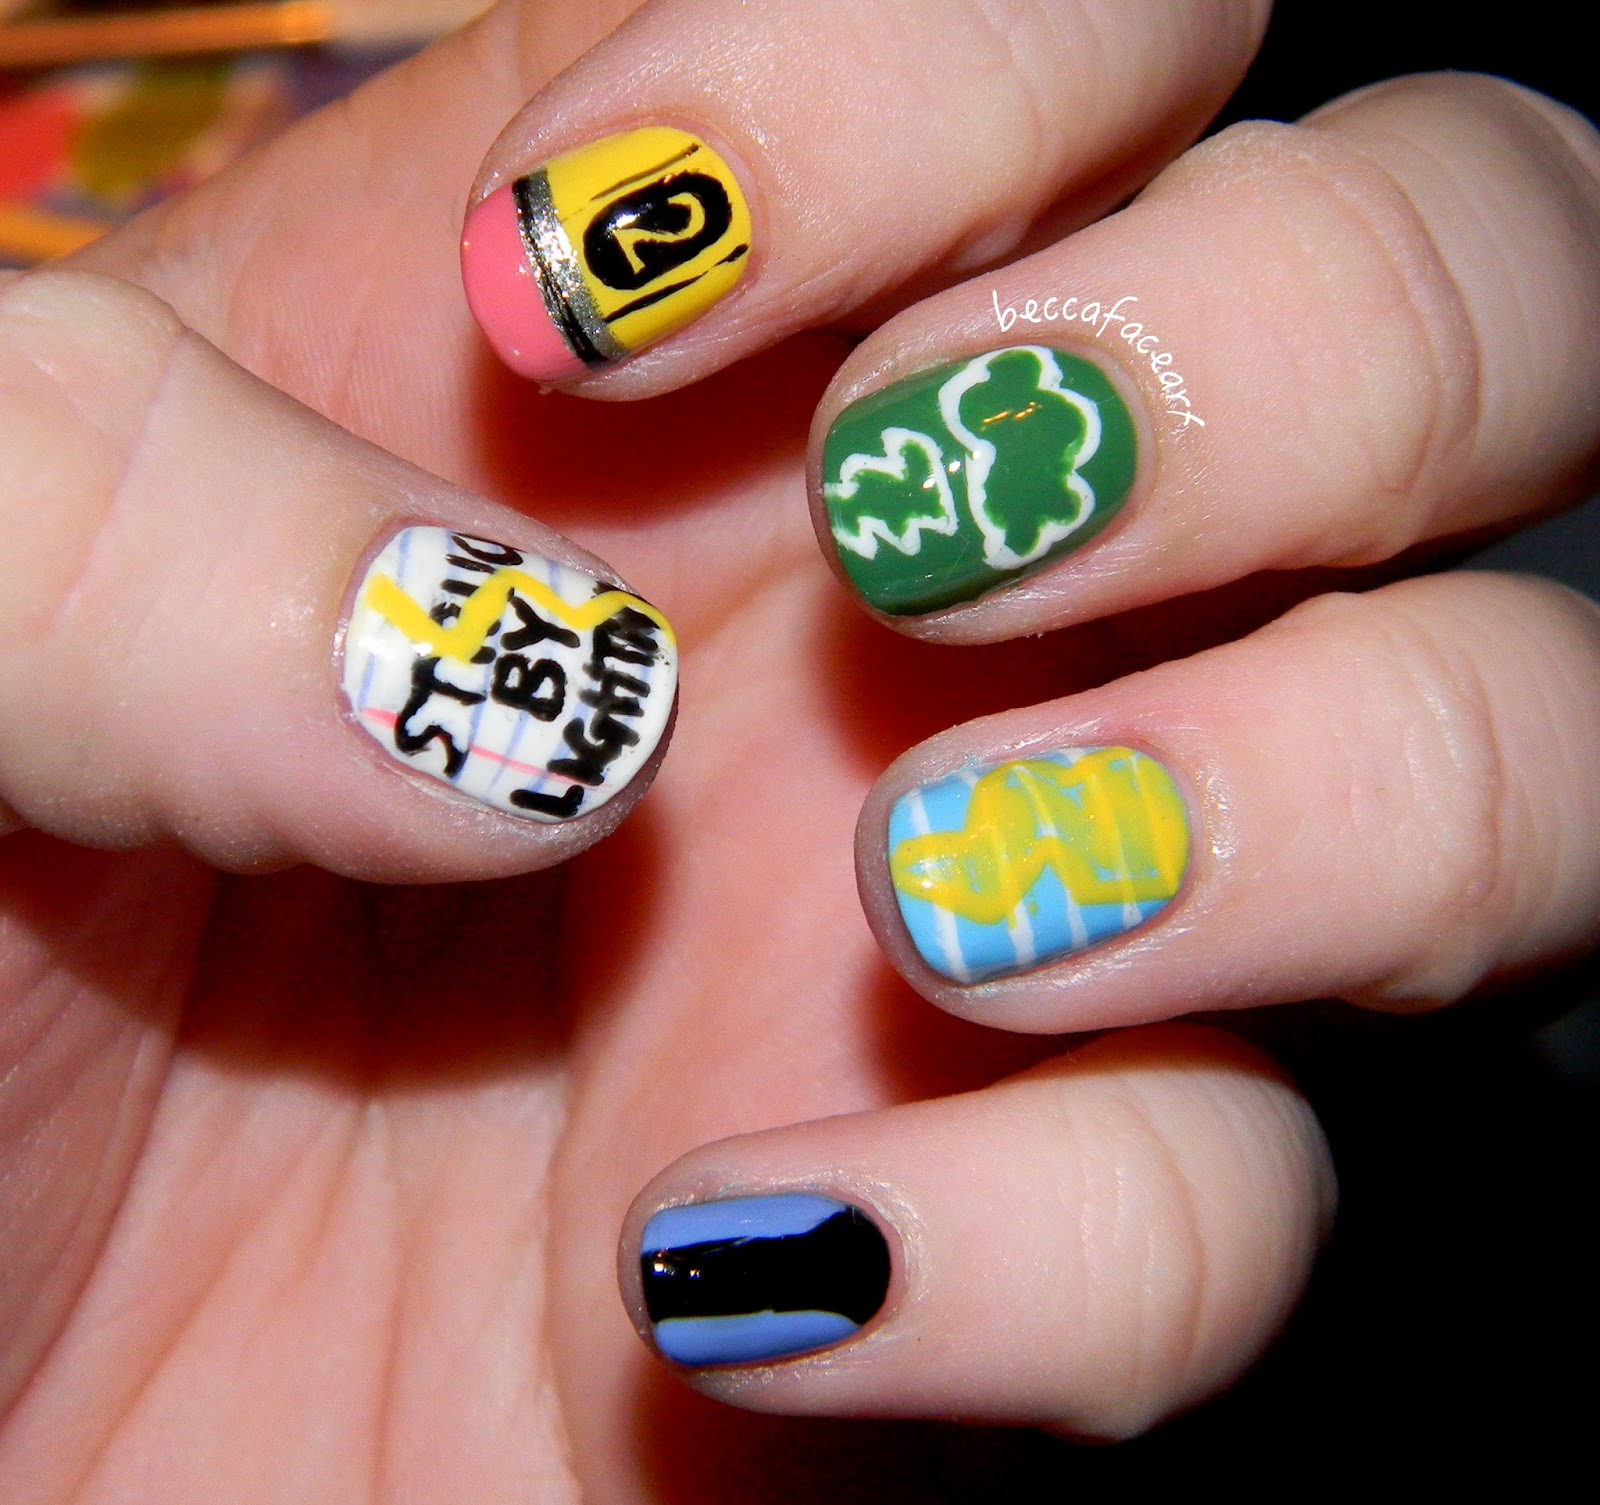
Struck By Lightning Nails

Hi there! I have a really cool design for you today! It's one of my favorites that I've ever done! :) It's based on the movie/book Struck by Lightning by Chris Colfer. If you haven't seen the movie, it's incredible. Do yourself a favor and watch it. It's a lovely film, and the book is just as amazing. Chris Colfer is probably one of the most talented men of our time, and I'm always eager to support him. So I painted my nails, inspired by his wonderful book!


Woo! I love these so much. I think I did a pretty good job of getting the images from the book and the movie right. :) Dare I even say they're pretty cute as a back to school design? Ha!

Thumb: Sinful Colors Snow Me White (base color), Sinful Colors Soul Mate (pink stripe on the side), China Glaze Secret Peri-Wink-le (blue horizontal stripes), Sally Hansen Mello Yellow (lightning), and black acrylic paint for the words.
Index: Sally Hansen Mello Yellow (base), Sally Hansen Celeb City (silver stripe), Sinful Colors Soul Mate (eraser tip), and black acrylic paint.
Middle: China Glaze Starboard (base), and white acrylic paint.
Ring: China Glaze Bahamian Escape (base), Sally Hansen Mello Yellow (lightning), and white acrylic paint.
Pinky: China Glaze Secret Peri-Wink-le (base) and black acrylic paint.
Topcoats: Seche Vite (glossy) and Essie Matte About You (matte)

I hope you like them as much as I do! I also hope you check out Struck By Lightning and the book that goes with it, because Chris Colfer deserves it and his work truly is incredible. Thanks so much for reading, have a great day, and happy painting! :)


Sunday, August 10, 2014

Back again... and Mermaid nails! :)

Hello everyone! It's been a looooooooooong time. An indecent amount of time. And for that, I am so sorry. Really, I tried to keep up with it, but I've had some mental health problems over the summer (after the crazy semester from hell at school), and I just kind of... stopped caring about my nails. I did still keep them mostly painted, but I've neglected my cuticles and I didn't do any nail art whatsoever. This is something that I never wanted to happen, ever. I love painting my nails and blogging with you guys, and I was always afraid that I would just stop one day and not start back up again. Well, after a long summer and some time to get back up on the metaphorical horse, I'm back! Another semester in college is going to be starting for me next week, and I decided it was time to nip this little mood in the bud and get back into the groove of things. :) So. I have a few more things to say and then I'll show you some mermaid nails! :)

1) If you have been keeping track of my 31 Day Nail Art Challenge posts, I am sorry to say that I'm not going to be continuing that. It honestly was a mistake of me to try and take that on, because I just wasn't that dedicated to it from the get-go. That being said, I have a few designs in a folder on my computer that I did complete for the challenge, but never posted. So I'll post those, but they won't be part of the challenge, because maaaaan. Forget that challenge *z-snap*.
2) And this brings me to my next point. I have several designs that I never posted from back in March-May. I will probably post some of those, because I like them and they're still nice designs... they're just a few months old, haha. So you will probably see those for the next few posts before any actually recent designs.
3) And finally, as you all know, I obviously have a problem with how long my posts are. I talk too much. As such, I'm going to try and keep them AS CONDENSED AS POSSIBLE in the future. For real. For designs, I might just say what polishes/stamps/paints I use and maybe elaborate a teeny tiny bit (an example will be below for the mermaid design). For reviews of polishes (such as indie polishes and swatches and things like that), those will be longer. But I honestly have to get a grip on the length of my posts, it's ridiculous.

With that, I just want to thank all of you for being patient with me, and for being amazing in general. :) You're wonderful and I am excited to come back to blogging because you all make it fun! And now, on to the nail art~~~~~~~~~ WOOOSH


Meeeermaaaaiiidssssss! I love mermaids, I think they're great. And they're the perfect summer manicure!

Base color: China Glaze Keep Calm, Paint On
Stamp colors: (gradient - from cuticle to nail tip) China Glaze Fancy Pants, Spontaneous, and Tart-y for the Party
Stamp: Mash Stamp Plate 39
Glitter: Orly Mermaid Tale

I really like for the scales to stand out, so I picked Keep Calm, Paint On as my base color because it's very pale and accepts other colors well. And the scales are all colors that look great together. The whole look is very shimmery and the glitter (only painted around the edges) gives a lovely rainbow pop on your nails. It's a subtle design but it's very eye catching! :) I hope you like it as much as I do!

Let me know if you have any questions or concerns, and let me know what you think of the new way of doing these posts. As in, do you prefer me to type everything out and keep my posts longer, or would you prefer me to list my supplies and keep it simple? I'd love to here from you about this. I just want to thank you again so much for reading, it absolutely means the world to me! Have a great day, and happy painting! :)


Friday, February 21, 2014

Belated Valentine's Day 2014 Nails - Gold Heart Studs

Hey everyone! So, I think the title of this post says it all, right? No need to explain? No...? Well, basically this week has been my "homework from hell" week. Coupled with last week, which was ANOTHER snow week here in Georgia. It's kind of scary, to be honest. It was below freezing every day last week and now it's 70 degrees out. The weather is doing weird things. So, because of the crazy weeks, I did not get to paint my nails for Valentine's Day (or as I fondly refer to it, Singles Awareness Day) until the 14th! And then I went out with my friends and my mom and watched Winter's Tale in theaters (can you say best holiday ever? Colin Farrell and Russell Crowe in the same movie? Mmmmm yes indeed) and then I haven't been able to post my manicure all week because of the homework from hell. But they're here now, so don't worry. I'm afraid they might not have been worth the wait, haha.


So for my base color, I used China Glaze Ahoy!, which is one of my absolute favorite CG polishes ever. You may not be able to tell in my photos (taken sans light box because I was in a hurry), but I think it's extremely flattering on my skin tone and it's just such a rich, glistening pink. I love it more than any other pink in my collection, hands down. I then paired it with some big (well, they were big on my teeny tiny baby nails, but they're probably medium sized for other people) gold heart studs that I got from Five Below. I had to bend the studs so they would sit flat on my nails, but they still ended up falling off within two days. But that was probably because I didn't bend them enough. Thankfully, I didn't lose them and they're still in good shape, so I can probably reuse them! :)

So I know this was super simple and a week late, but I still hope you enjoyed it! Let me know what you think. Thanks for reading, have a great day, and happy painting! :)

Thursday, January 30, 2014

KBShimmer "Clown Puke" Swatch

Alrighty, another indie! KBShimmer Clown Puke. Woohoo! I LOVE THIS ONE. So much. It was on my list of polishes that I need for a very long time. It's perfect in every way - So I'm super excited to show you my swatch! You know the drill by now, I'll show you the swatch first and then talk more about the polish afterward. :)


This is one perfect coat of Clown Puke over two coats of Essie Mint Candy Apple (I also tried it over my universal glitter base color, OPI Gargantuan Green Grape, and I didn't like it as much! So MCA it is.) This indie is loaded with glitter of every size in every shape - hex, square, circle, stars, hearts, you name it! And they're in every color!! My favorite glitters were the giant circle glitters, which you can just barely see one on my thumb in the first picture. It's so good. And like I said, this is one coat. It's so full of glitter. I had to do minimal placing of glitters as well, they just kind of fell where I wanted them to go. And the formula is fantastic, of course. Despite the sheer magnitude of glitter in this polish, it isn't thick at all. So basically, I give it a 10/10, would wear over and over again because it's perfect and beautiful.

I received this polish for Christmas, so my opinion is honest and hopefully it convinced you that you need this polish. Everyone needs it, for real. And if you feel that you need it as badly as I did, you can purchase it on KBShimmer's Etsy shop and their website.

So I hope you enjoyed! Thanks so much for reading, have a great day, and happy painting! :)


Subtle Purple Filigree Stamping

Hey there! I feel like I'm posting so much right now, even though I'm not. It's because we've literally had the whole week off from classes due to the lovely weather right now - The joys of living in Georgia. So I get four snow days while the state shuts down. In all seriousness, we are just not equipped to handle this weather, and the ice is terrible still. So we have our reasons for freaking out.

So since the weather is so cruddy, I've got a really subtle, dark design for you. But hopefully this design is not cruddy. ;)


(with flash)

So for this design I started with two coats of China Glaze Up All Night (this color has recently found its way into my collection, and it is STUNNING) and then I stamped the filigree stamp from Cheeky's Jumbo Plate #8, the Princess Charming plate, with China Glaze Love's a Beach. That polish is a neon shimmer polish, but it's sheer enough that it made the stamp look purple over the blue! It was very subtle, which I LOVE. I love how the slightly different stamp shade is just visible enough to pique someone's interest, and then they have to look closely to see it, and I just love it. Is that conceited of me? Pffft, nah. 

So that's it! It was super simple, and I hope you like it! Thanks for reading, have a great day, and happy painting! :)


Wednesday, January 29, 2014

31 Day Nail Art Challenge! Day 23: Inspired by a Movie

Heeeey! So for this challenge, I’m actually using the nails I wore when I went to see Thor: The Dark World. That’s inspired by a movie, right? J So this design, in my opinion, is not the most original Thor nails. And it’s not necessarily designed for Thor: The Dark World either. They’re just Thor and Loki nails, because I enjoy them both more than you would believe. So let’s get into it!


On my left hand I painted Loki because he’s my favorite. Don’t get me wrong, I like Thor a lot, but Loki’s such a good character and I am absolutely fascinated by his amorality. So on my thumb (not pictured here, but you can see it later on in the post) and ring finger, I painted two coats of Essie Good as Gold. On my index, middle, and pinky fingers, I painted three thin coats of Sinful Colors San Francisco. It’s such a lovely color, but so, so sheer. Then on my thumb, I painted “Loki” with San Francisco. On my ring finger, I painted a coat of a fine gold glitter (a random striper polish), but I think this design would look much better with some chunky gold glitter. I don’t have any. L And just because I wanted to keep the design simple, I painted Loki’s helmet on my middle finger with Good as Gold and some black paint with a tiny baby paintbrush. It’s adorable. And then I moved on to Thor!


On my right hand, I wanted to match my Thor nails to the style I painted Loki with, so on my thumb (again, not pictured, but you'll see it I promise), I painted two coats of Wet n' Wild Burgundy Frost. Then on my index, middle, and pinky fingers, I painted two coats of Wet n' Wild Denim Chrome. And on my ring finger, I painted two coats of Sally Hansen Celeb City and one coat of Essie Set in Stones. And for the designs - on my thumb I painted "Thor" with Celeb City and on my middle finger, I painted Mjölnir (or you could say Mew-Mew like Darcy in the movie) with Celeb City, Burgundy Frost and some black paint. 

And here's what they look like together!

There's those pesky thumbs!


So I hope you like them! I actually wore these to the movie premier, but I never posted them. But they fit the challenge perfectly, so hope was not lost and I finally got to show them to you. So let me know what you think, I'd love to hear from you!

Thanks for reading, have a great day, and happy painting! :)


Tuesday, January 28, 2014

31 Day Nail Art Challenge! Day 22: Inspired by a Song

Hey all! I have an idea for a new series of nail art that I want to do (and I’m excited to get started on it) but I realized that I really need to finish posting all of the 31 Day Nail Art Challenges before I can start on a new thing. So it’s going to happen, I’m in the last stretch!!

So for today, I have the “Inspired by a Song” challenge – I chose “Cough Syrup” by Young the Giant. I dunno, I guess I just wanted to have a good cry while I painted my nails. But I also thought it was descriptive and I liked the design I came up with for it.


I knew I was going to paint some more detailed designs, so I wanted a neutral background. I painted two coats of Orly Déjà Vu on all of my nails, and then I used acrylic paints for all of the art, just because it was easier to shade with craft paint than with nail polish. On my thumb, I painted a drum for the line “A wet world aches for a beat of a drum.” On my index, I painted a spoon of cough syrup for the line “One more spoon of cough syrup now.” On my middle finger, I painted the words “Losing my mind” for that very same line, haha. I used different shades of a pinkish-purple to make it look like a gradient, even though there was no actual blending involved. On my ring finger, I painted a zombie and a realistic heart for the line “These zombies in the park, they’re looking for my heart.” And finally on my pinky, I painted a “Splash of the sun,” which unfortunately looks like a sad sunny side up egg. I intended for it to look like a splatter spot sun, but it’s the thought that counts. J

So that’s it! I hope you like it! Thanks for reading, have a great day, and happy painting! J

Thursday, January 9, 2014

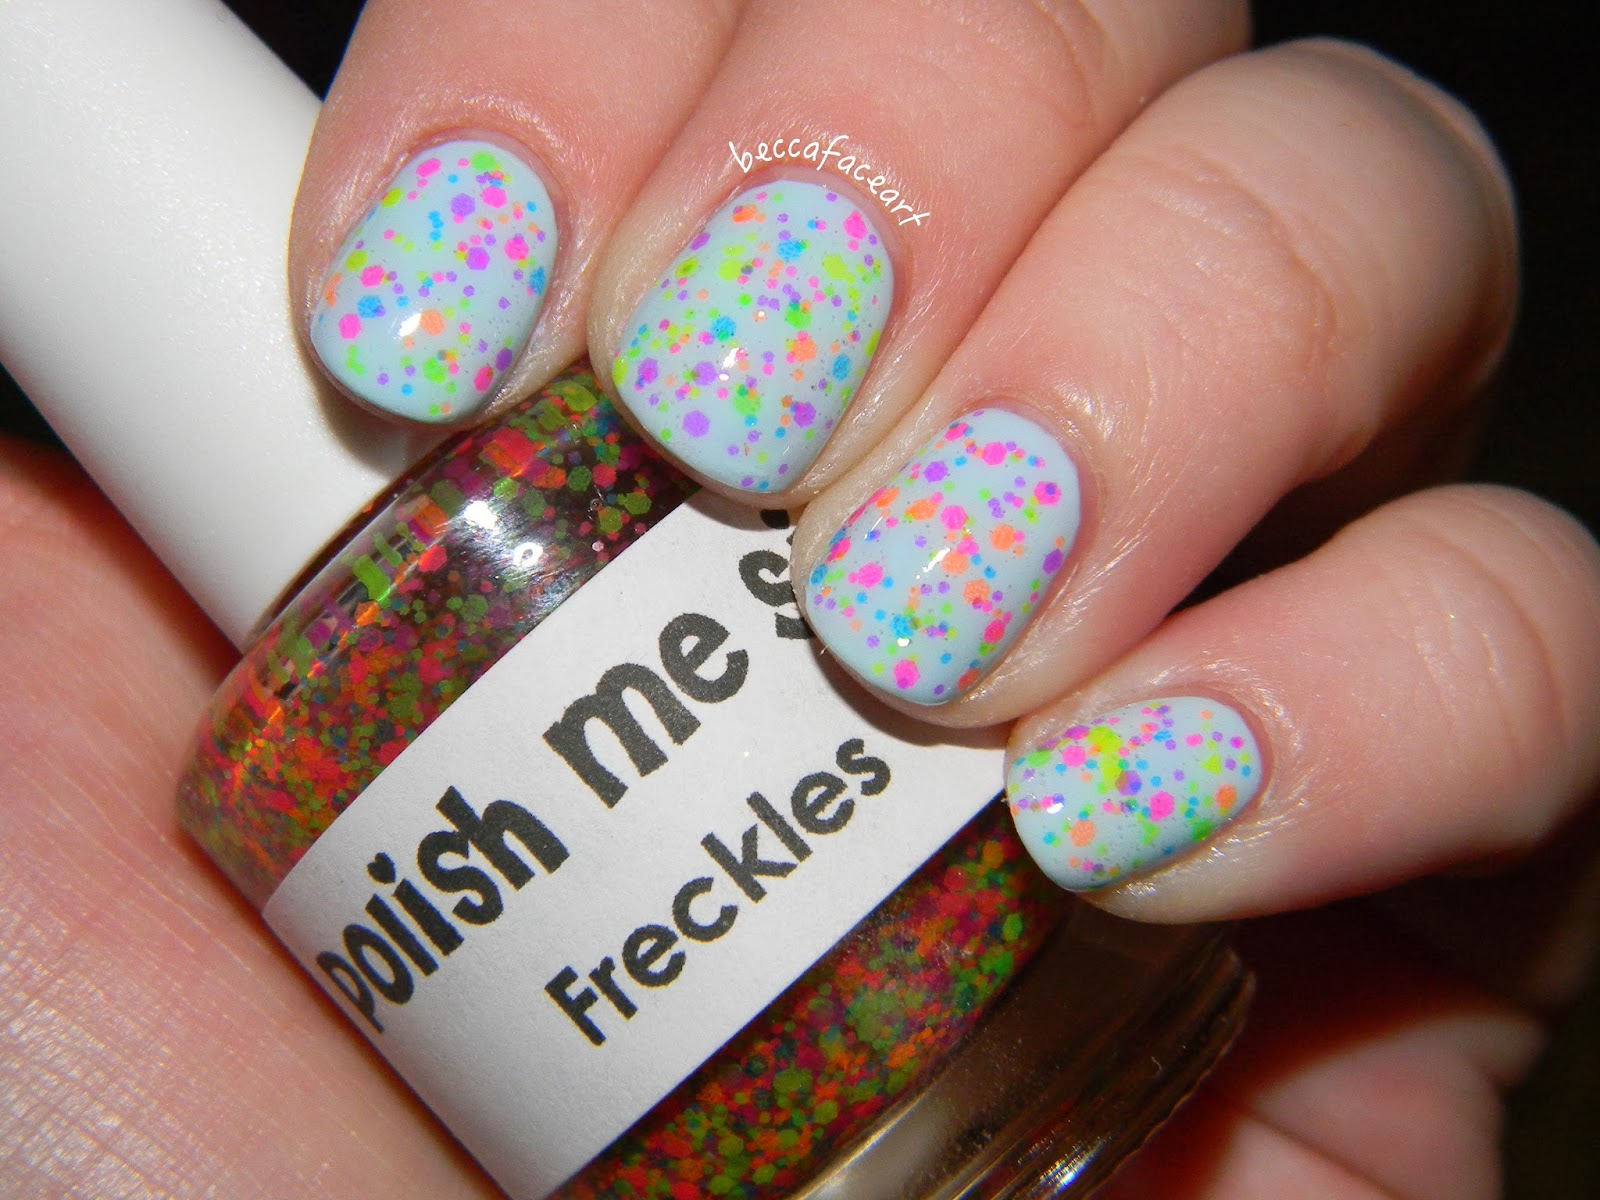
Polish Me Silly "Freckles" Swatch

Heeeeeeeey, look at me go! After not updating at all for two months, I'm starting to get back into it. Mostly because I have a million pictures piled up on my hard drive that I need to sort through and edit, so by default I'm having to blog as well. But at least I enjoy it. :)

So today I have an awesome swatch for you - Polish Me Silly (formerly known as Lush Lacquer) Freckles! My friend Payton got me this indie polish for my birthday (waaaay back in October - see how behind I am?) and I practically wore it the second she gave it to me. So even though these pictures were taken a while ago when it was fall, the colors are better for winter and spring. Just like with my other swatch/review thingies, I'll show you the swatch first and then talk about the formula afterwards.


This is one coat of Freckles over three coats of OPI Gargantuan Green Grape - And yes, that's GGG. It's just the blue version, not the green version. I might do a comparison of that someday, because there are definitely two versions of GGG

Alrighty, on to the formula and my thoughts about Freckles. First of all, Freckles has tons of small neon blue, green, pink, purple, orange, and highlighter yellow glitters packed into it. And the formula is awesome! It's not too thick, and it has great glitter payoff. I think this polish is really unique as far as the glitter goes - I know plenty of indie brands have some form of neon glitters, but this is my first time experiencing one, and it was interesting to find that the glitters are actually transparent and ultra-thin, just like neon nail polish. They're made of a different material than regular glitters. I liked them a lot! The only problem with these glitters is that you really can't put them over a dark color, because then they'll be dull and a few different shades of swamp. So I tested Freckles over a few bright colors, and I found that it works best over white, very light blue, pastel green, light purple, and bubblegum pink (I specifically used Gargantuan Green Grape, OPI You're Such a Budapest, Fresh Paint Honey Dew, and OPI Chic From Ears to Tail). You only need one coat for a perfect spread of rainbow freckles on your nails! I give this a 10/10 would wear again and again and again.

Thanks for reading, have a great day, and happy painting! :)

Wednesday, January 8, 2014

31 Day Nail Art Challenge! Day 21: Inspired by a Color

Hellllooooooo~~ How's it going? :) So, if you're familiar with this challenge, you know that this prompt is notoroious for being ambiguous. What does it mean to be inspired by a color?? It could be any color, so what's challenging about it? Well, it was challenging. Because you know me... I automatically went to the turquoise polishes. But then I thought... No. This is a challenge, I can't go to my go-to polishes. So I went with a different color, one I don't wear very often. Inspired by the color of the glitter polish I used:


Periwinkle! It's so pretty. I painted two coats of China Glaze Secret Peri-wink-le on all of my nails and then painted one coat of Essie Stroke of Brilliance on my thumb and ring finger for a glittery accent. Simple! So I hope you like it. :D

Thanks for reading, have a great day, and happy painting! :)

31 Day Nail Art Challenge! Day 20: Water Marble

Yes, I'm still doing this challenge. I'm so over it, haha. But I'm going to finish it! Anyway, I thought this day's challenge was going to be the most difficult for me, and I was right. I am AWFUL at water marbling. Just awful. It never works out, and I just end up wasting a lot of polish. But I did eventually get the polishes I chose to work, and I actually have two designs for you! My sister also wanted a water marble, and it was just a pain in the butt. At least it was pretty!


My sisters nails - I started with a base color of Sally Hansen Lava, and then I water marbled with Lava and Sally Hansen Pacific Blue.


Pardon the little cut on my cuticle in this picture, I got a little happy with the cuticle nippers! And also pardon the old water mark - these pictures were taken and edited like three months ago, haha. 


On my thumb and ring finger, I painted one coat of Fresh Paint Nebula, and then I covered it with a coat of Sinful Colors Scene Stealer. Wearing a glitter accent is a nifty little trick to avoid having to water marble on those two fingers, haha. And on my index, middle, and pinky fingers, I started with a base coat of China Glaze Pink-ie Promise. Then I marbled with Pink-ie Promise, China Glaze Life is Rosy, and Fresh Paint Nebula. Unfortunately for me, Nebula didn't marble as well on my nails as it did in my test swatches. So... It looks kind of wonky. But I liked it! My water marble had character. So I hope you like it! Let me know what you think of it. 

Thanks for reading, have a great day, and happy painting!

Friday, January 3, 2014

Pipe Dream Polish "Pink Elephants and Lemonade" Swatch

Hello all! I've got an indie polish swatch for you today to start off the new year! :) I put several indie polishes (and a ton of other mainstream polishes too) on my Christmas list this year, and I got several of them, so I'll have swatches of all of them sometime in the next few weeks! But for today, I'm sharing one of the polishes I was most excited to wear - Pipe Dream Polish Pink Elephants and Lemonade.


According to the description at Pipe Dream Polish's store, Pink Elephants and Lemonade is "made up of medium and small hot pink and deep yellow matte glitters in a dusty turquoise crelly base." That is definitely an accurate description, because the base isn't really jelly - it's actually pretty opaque. But not so opaque that you can't see the glitters from the first coat if you do more than one coat. So I'll show you my swatches first and then I'll talk about the formula and my thoughts afterwards:

(two coats, indoors)

(two coats, indoors)

(two coats, flash)

Alrighty! So, I'm absolutely in love with this polish for tons of reasons. First things first: The colors! It isn't a secret by now that I love turquoise, and there's just something about turquoise and yellow and pink glitters... It spoke to me on a personal level. It's a unique blend, in my opinion. And let's not forget the name - Pink Elephants and Lemonade. It just reminds me of that song from Dumbo. "Pink Elephants on Parade," anyone? Anyway, the pink and yellow glitters are matte and they're surprisingly subtle. It just gives such a nice polka-dotty look to the polish. I would give this a 10/10 on color, because it's just so darn cute.

The formula... is awesome! No fishing required for those beautiful glitters! And the base is opaque enough that you don't need underwear or more than two coats. I think you could even get away with one coat, if you like that sheer jelly-look. You would have to paint it veeerrry carefully for one coat, though. It is a little streaky to begin with, but two coats evens it out perfectly. Some other awesome things about this formula are that it is super fast-drying and it's chip-resistant! Now, I don't actually know if it's either of those things, but from my experience with it, it dried so freaking fast. It was like Seche Vite fast. This isn't always a good thing, because a few times when I went back over a spot I had already painted it tended to drag a little bit - but like I said, a second coat evens it all out and leaves a gorgeous finish. It's also chip-resistant for me. I say that instead of "long-lasting" because I only just painted it on two nights ago, so I can't actually know that yet. But polish doesn't last long on my nails at all, and this hasn't chipped yet! I don't even have tip wear, which is just insane to me. I'm so impressed. So it's definitely an awesome formula. It was a little bit thick at first; I did add a little thinner to help move things along, but not much - just enough to make it buttery.

So overall, I love this polish. LOVE IT. It was a great price ($8 on their Etsy store, although it is on sale currently on their bigcartel store for $7), even though I didn't buy mine (I got it for Christmas from my wonderful mom :D). I'm not being compensated at all for this review/swatchfest, I just wanted to share it with you all. This indie polish holds a special place in my heart already, and I have a feeling I'm going to wear it a lot in the spring when it gets really rainy here in Georgia. It kind of reminds me of April rain showers, actually. It's dusty and muted, but the pink and yellow glitters look like flowers. So I hope you all enjoyed this looong review, and let me know what you think! I do have eight more indies to show you, so if there's anything specific that you would like me to talk about when I'm reviewing, let me know. I also have the three custom polishes I made for my friends and my sister - but I have to swatch those and fix up the pictures before I talk about them. Did you notice I changed my water-mark? That's something I want to work on this year - better quality pictures! 

Anyway, thanks for reading, have an amazing day, and happy painting! :)


Tuesday, December 31, 2013

I'm a liar! And two New Year's Eve designs for you...

Hello all! Yes, I am a liar. I said I would have a lot of holiday designs and I was going to be posting regularly again and whatnot, and it just didn't happen. Technically I did have several holiday designs, but I just never posted them. I'm still trying to decide if I want to post them or just wait until next year. It's been a hectic month. You know? Sometimes things just suck and it was one of those times for me, so I hope you're not too upset. I'm sorry that I'm failing, haha. But I hope that these two mani's make up for it! These would be great for a New Year's Eve party! :)


This is a super simple manicure - just black and silver textured polish! It's super chic and would be perfect for celebrating the new year. Here I've used two coats of OPI It's Frosty Outside on my thumb and ring finger, and three coats of OPI Emotions on my index, middle, and pinky fingers. 


And here's a slightly more complex design for those of you who like a little more out of your mani's - I'm wearing this design right now for my party/get-together tonight. (I apologize for the picture, I ended up taking the picture on my iPhone because I got fed up with the bad quality my camera was giving me.) On my thumb, middle, and pinky fingers I did two coats of Wet n' Wild Black Creme with a gold round stud on each. Then on my index, I painted two coats of OPI Louvre Me Louvre Me Not, which is one of my all time favorite OPIs. Such a great polish. And on my ring finger, I did two coats of Essie Good As Gold, with a coat of "So This Is Love" over it. "So This Is Love" is one of the custom polishes I made for my friends as their Christmas presents this year, so don't worry, there will be a full post about that polish coming up soon! Since you won't have that polish, a good substitute would be Orly Ridiculously Regal. And of course, you can always use gold polish and a dotter tool instead of studs.

Alrighty then! I hope you enjoyed the designs! And if I don't post again between now and 2014, I just want to say thank you so much for reading and sticking with me while I struggle through blogging, haha. I'm going to try a ton of new things in the new year, new things that I hope will allow me to post regularly and keep blogging fun instead of making it seem like a chore to me. I never wanted it to get that way, so hopefully the new things I'm going to try will spice it up and keep the nail art good for all of you as well. And I hope you all have an amazing New Year's Eve, and have an amazing time bringing in the new year. Thanks for reading, have a fantastic day, and happy painting! :)

Thursday, December 5, 2013

Hello! I promise I'm not gone yet! :)

Hi all! I know that I'm severely long-winded and I'm sure that it is exhausting to read my posts, so I'm gonna hurry. So basically I have not updated all month because of school work. Yes, I know it is an extremely common excuse, but it is nevertheless the excuse that I'm using. I have been overloaded on assignments (literature reviews and experimental psychology stuff yuuuuck) and then when the assignments were over, I had tests and finals (I technically still have one to take next week, but then it will be over and I'll be free to blog and watch Netflix).

So this is just an update post to let you know that I am not gone, and I have a million things to show you. A few things you can look forward to: I am just about finished with the 31 Day Nail Art Challenge (I know, it is taking me FOREVER to finish that stupid challenge and I'm beginning to wonder if it was a bad idea to take it on), I got some beautiful indie polishes for my birthday (my friend Payton gave me three polishes, but I have only had the chance to wear one of them, but I will swatch them for you all to enjoy!), AND. The mother of all news. For Christmas this year, I decided it would be a great (bad?) idea to make custom indie polishes for my friends! I'm not going to go into much detail here, but hopefully that sounds exciting. I can't technically show you the polishes until I give them to my friends (because they're always watching... allllwaaaaaays waaaatcccchhiiiiiiiiiinnnggggg), but I promise the posts will be informative and long-winded as always. And finally, it is the holiday season (not that I need to tell you that, you probably already know), so there will hopefully be lots of designs that are wintery and nice! I do celebrate Christmas, but I know that there are plenty of readers out there who do not, so I'm not planning on doing very many Christmas-centered designs. So just lots of generic holiday things, haha. But that is what you have to look forward to.

Again, I'm super sorry I've been MIA, but I'm back, and I'm back with a vengeance (not really). I'm going to get stuff done! And I think once I get all of my posts updated, I'm going to try to set up a schedule for myself to keep things like this from happening again.

I hope you have an amazing day, thanks for reading, and happy painting!
~Faith

Tuesday, November 5, 2013

31 Day Nail Art Challenge! Day 19: Galaxies

Hello everyone, welcome all! The month of Halloween is now over and I am getting back into that 31 day nail art challenge! Starting the posts back up with one of my favorite designs... galaxies!

Just to make it easy on myself, because I have explained how to do a galaxy mani before, I'm just going to list the polishes I used under each picture. And I have three different color schemes for you because a lot of people wanted them. So I hope you like them! :)


My nails - Wet n' Wild Denim Chrome, China Glaze Dandy Lyin' Around, CoverGirl Blue You, Sinful Colors Let's Meet, China Glaze Strawberry Fields, China Glaze Towel Boy Toy, a nameless Bon Bon polish, and Sonnetarium Snowfall.

My sister's nails - Love & Beauty Emerald, Sinful Colors Snow Me White, L'Oréal Notting Hill Blues, Sinful Colors Let's Meet, China Glaze Ahoy!, and Sonnetarium Snowfall.

My friend Lindsay's nails - Wet n' Wild Denim Chrome, Sinful Colors Snow Me White, China Glaze Towel Boy Toy, NYC Charming Rose, a nameless Bon Bon polish, and Sonnetarium Snowfall.

Thanks so much for reading, have a great day, and happy painting! :)

Tuesday, October 29, 2013

Halloween Zombie Flesh Nails

WARNING! THIS POST IS NOT FOR THE FAINT-HEARTED. IF YOU ARE SQUEAMISH, YOU PROBABLY DON'T WANT ANY PART OF THIS. For this reason, I'm putting the pictures under a break! So read on if you can handle it. :)

Anyway, hello everyone! I know I'm cutting it pretty close to Halloween for these nails, but I am technically getting them up before Halloween! I wanted to wait until the last week before Halloween to do the really gory stuff. And I wish I could take the credit for this design, but it is not mine! I based it on a tutorial by PackaPunchPolish (WARNING: THIS VIDEO IS ALSO GORY IN A WAY SO DON'T WATCH IT IF YOU'RE EASILY SQUEAMISH I'M SERIOUS) on youtube. I have literally been waiting a year to do this, haha. I didn't do it exactly, I adapted it to zombie flesh instead, so it's extra gross. And since there's a tutorial for it already, I'm not really going to explain what I did, just what polishes I used. And now for the unveiling! Click the read more to see the pictures! This is your last chance to turn back!

Thursday, October 24, 2013

Halloween Rotten Pumpkin Nails!

Hello all. :) Halloween isn't Halloween without some pumpkins, right? So I painted pumpkins.... rotten pumpkins!!


(Sorry this picture is blurry! But I wanted a shot of my thumb)

Yes, I know... they're kind of disgusting. But I think they're gross in an endearing way. So, on my index, middle, and pinky nails, I painted one coat of Wet n' Wild Black Creme, and then one coat of Orly R.I.P. On my accent nails, I painted one coat of China Glaze Life Preserver and then one coat of Sinful Colors Cloud 9 to give it some shimmer and add dimension to the color. Now comes the fun part... making them look rotten! Since R.I.P. has a black jelly base, I just took it and wiped as much of the polish as I could on the lip of the bottle, then I lightly streaked it over the orange. Since it's really sheer, it just left these dirty streaks. The best way to replicate this without that specific polish is to mix a little bit of black nail polish with clear polish on a palette or a piece of paper and then streak that over your nails. Or you could even use a darker shade of orange. Whatever you've got! Then I took a black striper polish and painted on the faces wit thin, short, and fast lines. So I hope you like it! Let me know if you try it out. :)

Thanks for reading, have a great day, and happy painting! :)

Tuesday, October 22, 2013

Sephora Formula X Law of Attraction Swatch

Hi everyone! So before I get back into the Halloween designs, I need to share my birthday nails with you! So, technically yesterday (Oct. 21) was my 21st birthday, but I'm just getting this put up today. I tried to come up with a design for a really long time for my birthday, and in the end, it just didn't happen. I stumbled across Sephora Formula X Law of Attraction at Sephora, and it was love at first sight. And I bought it, and then I decided that that was my birthday polish. So here it is:

Bottle shot - this is the back of the bottle so you can see those beautiful indigo holographic glitters in there. Ugh, this is a perfect polish.


I painted one coat of Law of Attraction over two coats of OPI Don't Touch My Tutu. It needed some underwear, but I didn't want anything as stark as a white polish, so I went with a super sheer white, just to cover up the stain on my nails. Appearance-wise, this is the most beautiful polish I own. My picture doesn't do it justice. It's gold in every light, but once you get it outside, those indigo glitters flash a million rainbows and explode off your nails in a glorious shine. It is absolutely stunning. Formula-wise, it left something to be desired. I'd expect for a $14 polish, it should have an amazing formula, but it didn't. It's not hard to get the glitters where you want them to go, and it's certainly packed enough with glitter that I didn't have to fish or place too many. But it's just so ridiculously goopy. I had to thin it out before I even used it, because I knew it just wouldn't glide after testing it on a nail wheel. But once I thinned it, it turned into butter. Golden, rainbow indigo glitter-ridden butter. I think this polish would also be perfect for winter layered over white, but I'm not there yet. So, as far as the polish goes, 10/10, would buy again. The formula wasn't a problem for me once I thinned it out, so I don't mind. But the beauty makes up for it, because oh man. These were the sparkliest nails I've ever had. 

Anyway, I hope you like them! They weren't the most original birthday nails, but they were certainly the most glamourous. Thanks for reading, have a great day, and happy painting! :)

Halloween Purple People Eater Nails

Heeeyyyyyoooooo! So, I have been crazy busy. It's ridiculous how much homework I have. But I finally got a night off! So I figured I needed to update a few posts while I can! And thus, I present to you a design inspired by my favorite Halloween song - Purple People Eater!


Isn't he cute?? In the song, he's a "one-eyed, one-horned, flying purple-people-eater." And it actually does say in the song that he eats purple people, not that he's purple. So I chose a different color instead - I started with a base color of China Glaze Life Preserver, and then I did a coat of China Glaze Glitter Goblin, which is a mix of orange, silver, and holographic glitters. It looks out of this world, so I thought it fit! Anyway, then I stamped a teeny tiny wing from the heart image on Pueen plate 41. Then I dabbed a little topcoat on it and placed a single googly eye. I love those googly eyes. Anyway, then I painted on the horn and the mouth with acrylic paint. 

Then on my other hand.... PURPLE PEOPLE! So, I bet you're wondering what's up with my color choices, because they don't really match. Well, I was supposed to go to a mini-golf course that's indoors and has black lights all over the place, so I painted these with the glowiest polish I own - Funky Fingers Like Clockwork!


Woo! These babies glowed even in the daylight, that polish is so freaking bright. Anyway, I put to coats of Like Clockwork over one coat of Sally Hansen White On, and then I painted on the purple people. The monster eats purple people, so I made them look like little gingerbread men, with some of them having bites taken out of them already! They were super cute.

So I hope you like it! Hopefully I did the song justice, because it is seriously the best Halloween song other than the Monster Mash (maybe I'll do that next.... hmm.) Anyway, thanks for reading, have a great day, and happy painting! :)