WARNING! THIS POST IS NOT FOR THE FAINT-HEARTED. IF YOU ARE SQUEAMISH, YOU PROBABLY DON'T WANT ANY PART OF THIS. For this reason, I'm putting the pictures under a break! So read on if you can handle it. :)
Anyway, hello everyone! I know I'm cutting it pretty close to Halloween for these nails, but I am technically getting them up before Halloween! I wanted to wait until the last week before Halloween to do the really gory stuff. And I wish I could take the credit for this design, but it is not mine! I based it on a tutorial by PackaPunchPolish (WARNING: THIS VIDEO IS ALSO GORY IN A WAY SO DON'T WATCH IT IF YOU'RE EASILY SQUEAMISH I'M SERIOUS) on youtube. I have literally been waiting a year to do this, haha. I didn't do it exactly, I adapted it to zombie flesh instead, so it's extra gross. And since there's a tutorial for it already, I'm not really going to explain what I did, just what polishes I used. And now for the unveiling! Click the read more to see the pictures! This is your last chance to turn back!
Tuesday, October 29, 2013
Thursday, October 24, 2013
Halloween Rotten Pumpkin Nails!
Hello all. :) Halloween isn't Halloween without some pumpkins, right? So I painted pumpkins.... rotten pumpkins!!


(Sorry this picture is blurry! But I wanted a shot of my thumb)
Yes, I know... they're kind of disgusting. But I think they're gross in an endearing way. So, on my index, middle, and pinky nails, I painted one coat of Wet n' Wild Black Creme, and then one coat of Orly R.I.P. On my accent nails, I painted one coat of China Glaze Life Preserver and then one coat of Sinful Colors Cloud 9 to give it some shimmer and add dimension to the color. Now comes the fun part... making them look rotten! Since R.I.P. has a black jelly base, I just took it and wiped as much of the polish as I could on the lip of the bottle, then I lightly streaked it over the orange. Since it's really sheer, it just left these dirty streaks. The best way to replicate this without that specific polish is to mix a little bit of black nail polish with clear polish on a palette or a piece of paper and then streak that over your nails. Or you could even use a darker shade of orange. Whatever you've got! Then I took a black striper polish and painted on the faces wit thin, short, and fast lines. So I hope you like it! Let me know if you try it out. :)
Thanks for reading, have a great day, and happy painting! :)
Tuesday, October 22, 2013
Sephora Formula X Law of Attraction Swatch
Hi everyone! So before I get back into the Halloween designs, I need to share my birthday nails with you! So, technically yesterday (Oct. 21) was my 21st birthday, but I'm just getting this put up today. I tried to come up with a design for a really long time for my birthday, and in the end, it just didn't happen. I stumbled across Sephora Formula X Law of Attraction at Sephora, and it was love at first sight. And I bought it, and then I decided that that was my birthday polish. So here it is:


Bottle shot - this is the back of the bottle so you can see those beautiful indigo holographic glitters in there. Ugh, this is a perfect polish.

I painted one coat of Law of Attraction over two coats of OPI Don't Touch My Tutu. It needed some underwear, but I didn't want anything as stark as a white polish, so I went with a super sheer white, just to cover up the stain on my nails. Appearance-wise, this is the most beautiful polish I own. My picture doesn't do it justice. It's gold in every light, but once you get it outside, those indigo glitters flash a million rainbows and explode off your nails in a glorious shine. It is absolutely stunning. Formula-wise, it left something to be desired. I'd expect for a $14 polish, it should have an amazing formula, but it didn't. It's not hard to get the glitters where you want them to go, and it's certainly packed enough with glitter that I didn't have to fish or place too many. But it's just so ridiculously goopy. I had to thin it out before I even used it, because I knew it just wouldn't glide after testing it on a nail wheel. But once I thinned it, it turned into butter. Golden, rainbow indigo glitter-ridden butter. I think this polish would also be perfect for winter layered over white, but I'm not there yet. So, as far as the polish goes, 10/10, would buy again. The formula wasn't a problem for me once I thinned it out, so I don't mind. But the beauty makes up for it, because oh man. These were the sparkliest nails I've ever had.
Anyway, I hope you like them! They weren't the most original birthday nails, but they were certainly the most glamourous. Thanks for reading, have a great day, and happy painting! :)
Halloween Purple People Eater Nails
Heeeyyyyyoooooo! So, I have been crazy busy. It's ridiculous how much homework I have. But I finally got a night off! So I figured I needed to update a few posts while I can! And thus, I present to you a design inspired by my favorite Halloween song - Purple People Eater!


Isn't he cute?? In the song, he's a "one-eyed, one-horned, flying purple-people-eater." And it actually does say in the song that he eats purple people, not that he's purple. So I chose a different color instead - I started with a base color of China Glaze Life Preserver, and then I did a coat of China Glaze Glitter Goblin, which is a mix of orange, silver, and holographic glitters. It looks out of this world, so I thought it fit! Anyway, then I stamped a teeny tiny wing from the heart image on Pueen plate 41. Then I dabbed a little topcoat on it and placed a single googly eye. I love those googly eyes. Anyway, then I painted on the horn and the mouth with acrylic paint.
Then on my other hand.... PURPLE PEOPLE! So, I bet you're wondering what's up with my color choices, because they don't really match. Well, I was supposed to go to a mini-golf course that's indoors and has black lights all over the place, so I painted these with the glowiest polish I own - Funky Fingers Like Clockwork!

Woo! These babies glowed even in the daylight, that polish is so freaking bright. Anyway, I put to coats of Like Clockwork over one coat of Sally Hansen White On, and then I painted on the purple people. The monster eats purple people, so I made them look like little gingerbread men, with some of them having bites taken out of them already! They were super cute.
So I hope you like it! Hopefully I did the song justice, because it is seriously the best Halloween song other than the Monster Mash (maybe I'll do that next.... hmm.) Anyway, thanks for reading, have a great day, and happy painting! :)
Tuesday, October 15, 2013
Depression Awareness Month Nails
Hello all! So, October is pretty much known for three things: Halloween, having the best weather out of all the months, and breast cancer awareness. But did you know that October is also Depression Awareness month? Well, now you do. Here is a fantastic webpage that should give you a good idea about how prevalent depression is. I personally know people who suffer with depression and I have experienced it myself. It's much more serious than just feeling sad - it's feeling sad, and angry, and exhausted, and unmotivated, hopeless, and helpless. It's thinking you're worthless and that no one can help you. It's becoming uninterested in your favorite things - mine was drawing and painting. Depression is serious and deserves the awareness. So I went around like a fairy wearing my green nails (because the depression awareness ribbon is emerald green) educating people about depression and how to help those who have it! But I'm not going to do that here - just know that people with depression are not making it up and it's not nearly as simple as "just being happier." It is an illness that needs treatment, and it affects real people who need understanding and acceptance. So here's what I did:


On my left hand (thumb to pinky): Sinful Colors Envy and Orly Mermaid Tale, China Glaze Tree Hugger, Zoya Logan, Sinful Colors Innocent and China Glaze Graffiti Glitter, and Sinful Colors Happy Ending.
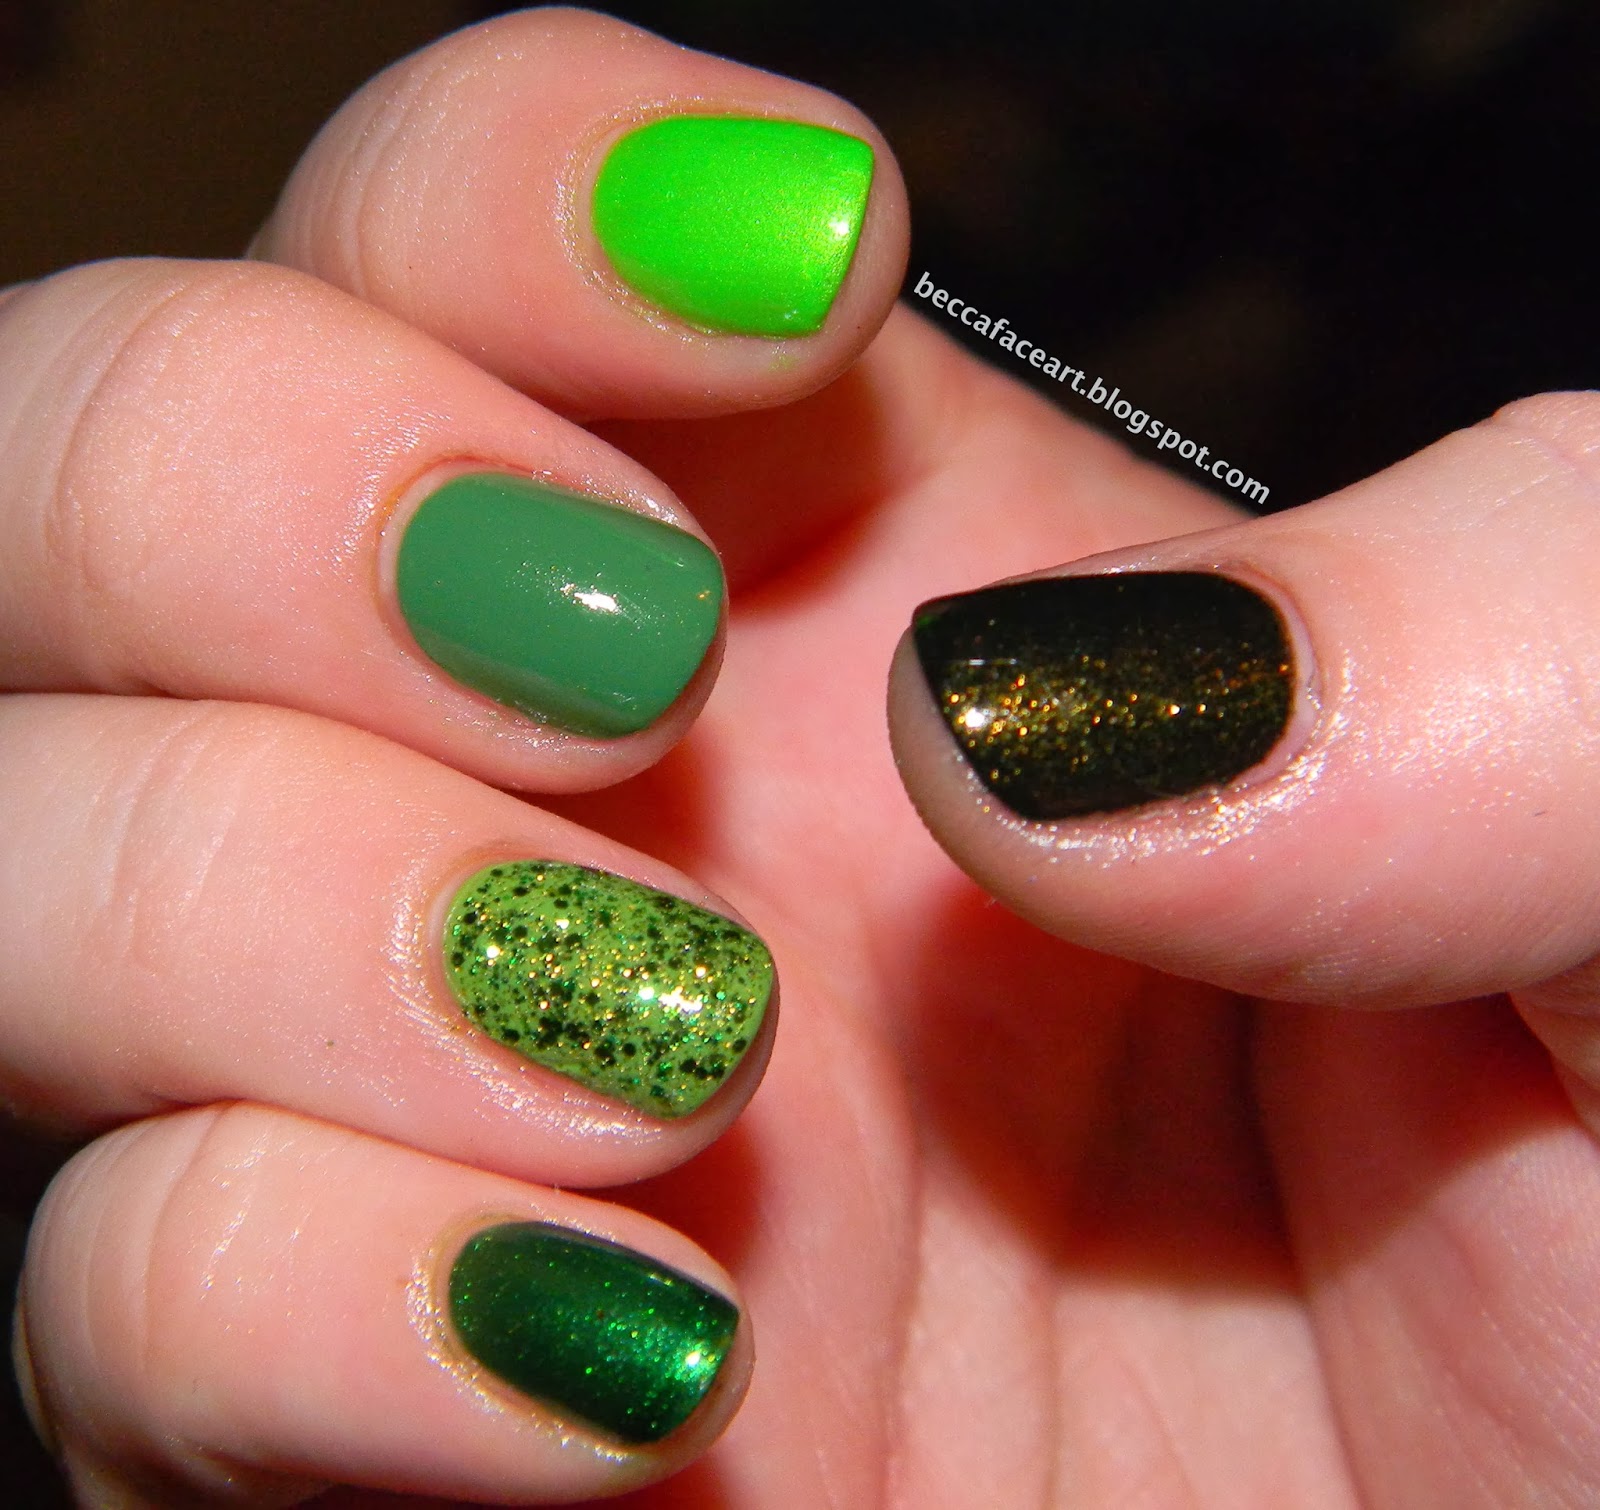

On my right hand (pinky to thumb): Sinful Colors San Francisco, China Glaze Gaga For Green and Sinful Colors Call You Later, China Glaze Starboard, China Glaze I'm With The Lifeguard, and China Glaze Cast A Spell.


I basically took all my green polishes and used them, haha. Green makes me very happy, and it was helping me represent a cause that is important to me. Sounds like a perfect manicure! So I hope you like them. Thanks so much for your awareness, and feel free to share your experiences! Thanks for reading, have a great day, and happy painting! :)
Sunday, October 13, 2013
Halloween Witch's Brew/Magic Slime Nails
Wooo, I'm on a roll today! It's just because I've already painted all these designs, I just didn't upload them the day I did them. Sigh, my blog is just a perpetual mess. Anyway, here is my Witch's Brew/Magic Slime (I couldn't decide which name fit it better) design:


I don't think I meant to, but I managed to get all the most obnoxious Halloween colors in it? But I love it!! My base color is Sinful Colors Cloud 9. Then I took China Glaze Grape Juice and dotted it along the tips in a dripping pattern. It wasn't sparkly enough for me, so then I covered it with a purple glitter from Love & Beauty (Forever 21's brand) - I have no idea what the name of it is, because my bottle has no label. But I tried googling it, and I've seen it called Cauldron? Or it could just be Purple Glitter. I'm not sure. If you know what it's called, please let me know. Anyway, over that, I put Icing Love It and Orly Mermaid Tale for some magic bits (glitter, basically). And then, to make it even more spooky, I stamped the spider image from MASH plate 38 with Sinful Colors Innocent on my accent nails. Whew, that's a lot. But lemme tell you... They were so Halloween. They screamed Halloween. So I hope you like them! Let me know what you think. :)
Thanks for reading, have a wonderful day, and happy painting! :)
Thursday, October 10, 2013
Halloween Ghostie Nails!
Hi there! So now I'm finally getting into my Halloween nail designs (unless you count the princess nails, because that would be the start then). I'm going to have quite a few, I hope, but I somehow managed to get a late start on them. I just couldn't decide on what I wanted to do. But then a little voice in the back of my head spoke to me... "Paint ghosties.... paaaiiinnnttt ghooooossttiiiiieeeessssss~"


These were so much fun, even though they took me forever to paint. I started with a base coat of Sally Hansen Black Out on my thumb, index, middle, and pinky fingers, and then I did one coat of Orly Green Flakie Top Coat (yes, that's the name of it. Not very creative, Orly) over the black, which gave it just a little bit of pizazz under the ghosts. It's a combination of blue and purple flakie glitters, perfect for a Halloween design. On my ring finger, I did two coats of Sally Hansen White On. Then I painted the ghosts with white and black acrylic paint. Oh, and did I mention these babies GLOW??

Super rad, right? I used glow-in-the-dark acrylic paint for a single ghost on each nail, with the exception of my ring finger, which just needed to completely glow. So I hope you like them! Of course, you can try this design a bunch of different ways. You could paint all your nails black (with optional flakie topcoat, because I know not everyone is going to have it) and just have the swirly ghosties, or you could have the "evil" ghost face (because lesbehonest, he's not very evil) on your accent nails. You could also have all the ghosts be glow-in-the-dark! They looked way cooler, because the paint was transparent and you could see the flakie colors underneath them. Let me know if you try them out. Also, if you have any requests for Halloween designs, tell me! I'll be glad to try things out. :)
Thanks so much for reading, have a great day, and happy painting! :)
Pretty Pretty Princess Nails
Heeeey gurl, heeeey. So, I just got some new OPI polishes that I desperately wanted to wear. But it's October, and I also desperately wanted to wear some Halloween designs. The problem? All of the polishes I got were bright pink (and one super light purple). I didn't think this through. So, I came up with a solution - ¿¿Porqué no las dos?? Why not both? So I made up a little costume for my nails - a princess costume!!


Yes, I realize it's not very Halloween-appropriate. But who knows, someone out there might need it for an actual princess costume! On my thumb and ring finger, I did two coats of OPI Suzi's Hungary Again and then stamped the crown image from MASH plate 49 with Essie Good As Gold. The pink glitter pieces are from OPI Minnie Style. On my index, middle, and pinky fingers, I painted three coats of OPI Chic From Ears To Tail, and then stamped the little swirly image from Pueen plate 26 on the tips of my nails with Suzi's Hungary Again. And then I topcoated and watched the magic happen! These were really cute, and I would wear this design again in a heartbeat. My 20-something-year-olds group of friends and I thought they were precious, so I'm sure there are some kids (adults too) out there somewhere that would love these to go with their costume. Anyone out there being a princess for Halloween? Let me know!
Thanks so much for reading, have a great day, and happy painting! :)
Tuesday, October 8, 2013
31 Day Nail Art Challenge! Day 18: Half Moons
Hello there! I'm going to keep it short and sweet today - It's half moon time!


I started with a base coat of Sally Hansen Insta-Dri Petal Pusher (what a mouthful) and then did two coats of Orly Déjà Vu. Looking back on it, it might have worked better if I did two coats of Petal Pusher and one coat of Déjà Vu. But oh well. Then I thinned out China Glaze First Mate and free-handed the half moons with my teeny tiny paint brush. It was not as difficult as I thought it would be, but it would probably be easier if I had used a guide or a hole protector. Regardless, the blue shimmer in Déjà Vu went really well with First Mate. So I hope you like them! It's not anything crazy, just something simple for this challenge. Thanks for reading, have a great day, and happy painting. :)
Sunday, October 6, 2013
31 Day Nail Art Challenge! Day 17: Glitter
Waaaaaasssuuuuup? So for this challenge, I've got a really fun design for you! :) One that both satisfies the glitter challenge, and is perfect for Halloween!


That's right... Googly eyes!! My glitter was the inspiration: Salon Perfect Kaboom. I tried getting a good close-up of the glitter, but my camera just isn't made for that, unfortunately. But I think you can tell in a few of them that the polish is actually just blue and yellow glitter. But the two of them together and the density of the glitter makes it look green overall! It's pretty awesome! I started with a base color of OPI Can't Find My Czechbook, and then two coats of Kaboom. I thought it looked kind of creature-ish, so I pulled out some googly eyes and made cute little monster nails. My friend actually said they looked more like dinosaurs, but that works too! These probably would have been hilarious with little mouths, but I was going for something easy that really focused on the glitter. If you're wondering about wearing googly eyes on your nails, I literally just pushed mine down into the wet glitter, and then I put top coat over it to seal them in. I thought they would come off immediately, because they stuck up off my nail pretty far, but they were practically cemented on my nails, haha. I couldn't pull them off if I tried. At least, not without hurting myself. I don't suggest using Seche Vite as a top coat to seal 3D pieces on to your nails, because that never worked for me. I used Out The Door to seal mine in. But it's up to you. :) And to remove the glitters (I thought it was going to be awful because they were cemented to my nails) but I just used the glitter-foil-removal method, and they came off beautifully! Actually, I think the acetone melted the plastic eyes, haha.
The eyes really gave my nails character, so let me know if you decide to try it out! Thanks for reading, have a great day, and happy painting! :)
Wednesday, October 2, 2013
31 Day Nail Art Challenge! Day 16: Tribal Print
Oooooh boy, I'm going to make some enemies today (but hopefully not because I know you're all wonderful, understanding people).
So, I'll just get right into the reason I didn't exactly follow the rules for this day. "Tribal" print is cultural appropriation, which is not good at all. Basically, since I am a white privileged woman (part of a dominate culture), it isn't right for me to decorate myself (my nails) with something that is from a minority culture that isn't my own, especially since the whole appeal to tribal print (the fact that it's called tribal print itself is offensive) is just that it is exotic and looks cool. This is problematic because a whole culture and its art and beliefs should not be reduced to some nail art. Not by me, at least. It's a popular trend, but I won't do it. I'm not going to exploit images from cultures that I don't belong to - images that hold meaning in these cultures, but not to me. I won't misrepresent a culture, I won't claim it as a fashion statement, and I'm not going to pretend that I'm part of something that I know I'm not part of. I know that there are people out there that are genuinely part of whichever culture they're representing in "tribal" nail art, and that's fine. Those are the people that should be doing this kind of nail art. Not me. I don't want you to misunderstand what I'm saying, because I'm absolutely supportive of assimilation of different cultures (the USA is the melting pot of the world afterall, and that's awesome) and learning about new cultures, but this isn't the same thing. This is saying "Hey, I think that design looks cool, so I'm going to paint it on my nails, even though I know minimal information about said design and your culture." I'm going to leave it at that. I hope this makes sense. If it doesn't, I hope you'll find more information in the cultural appropriation link (it's just Wikipedia, but I feel that it's pretty accurate) above, and if you have any questions for me, please ask them. I also hope this didn't sound antagonistic, because that's not what I'm about at all. My aim isn't to say anyone is a bad person for doing tribal print nails. I'm just explaining and educating why I won't do it, so I hope you can understand that. And if this happens to influence your opinions about tribal print in the process, then it's a win/win situation. And thanks for reading all of this, if you did. :)
That being said, I didn't do absolutely nothing for this day. Because it is a challenge, and even though I disagree with the premise, I'm not going to skip it. Instead, I picked a cool stamp from Pueen plate 49:


At first I thought the stamp was similar to Gaelic designs, but it's really not. I started with a base color of China Glaze For Audrey, and then two coats of a nameless Bon Bon polish that I've literally had since I was a kid. It's so old, haha. But it still works, and it's pretty! I stamped with Sinful Colors Calypso, which probably wasn't the best polish to use. It had a weird effect where it was darker on some nails than others? You can see it's much darker on my index finger in some of the pictures. *shrug*
Anyway, thanks so much for sticking around after my little mini-rant, haha. It's important to me, so I hope it wasn't too off-putting. Thanks for reading, have a great day, and happy painting! :)
Tuesday, October 1, 2013
31 Day Nail Art Challenge! Day 15: Delicate Print
Heeeeyooooooooo!~ Okay, who’s up for some LIGHTNING??


Cool, huh? I wasn’t really sure what to do for Delicate
Print, because I assumed it meant lace or writing or something like that. But
then I decided that it could be anything that was fragile and bright, so why
not lightning? My base color was Love & Beauty Light Blue (three coats), and the lightning was white acrylic paint and a teeeeeeny tiny brush. The base color I used had silver glitter in it, so it made the lightning glow. Gosh, they were so pretty. And very simple! :D
So I hope you like them as much as I did. Thanks for reading, have a great day, and happy painting! :)
31 Day Nail Art Challenge! Day 14: Flowers + Update
UPDATE
Hey there! How is everyone doing? So, I’ve got some news.
Today is October 1st, and I LOVE OCTOBER. LOVE IT. HAPPY OCTOBER 1ST
EVERYONE. And since the entire month for me is Halloween and my birthday,
that’s what I’m doing this month! So I’m taking a break from the 31 Day Nail
Art Challenge until after October is over. Now, this isn’t to say that I
absolutely won’t do any of the challenges, because I might have time to fit in
one or two. But I have a huge list of designs and polishes I want to wear this
month, so I’m going to focus on those instead. The being said, I have like… 8
Challenge Days that I've done but haven’t posted. SO! I’ll be posting all of
those today, no exceptions. I’m not just saying it this time, because I also
have my first Halloween-ish design that I have to get up today. It’s going to
happen. I hope you’re all as excited as I am! :) So let’s get to it!
Here are my flower nails:


I have to be honest, these didn't turn out like I expected. They are based on the Lily of the Valley flower, which are beautiful and fluffy-looking, but my painting just doesn't do them justice. The base color is China Glaze Tart-y for the Party, and the flowers themselves are done with acrylic paints. I think I may have liked them better if I had made all of my nails like my thumb, because the blooms I painted on my thumb look random and more like the actual plant. Either way, these were cute. They would be perfect for spring!
So I hope you like them! Let me know what you think, I'd love to hear from you. Thanks for reading, have a great day (and a happy October 1st), and happy painting!
Subscribe to:
Posts (Atom)